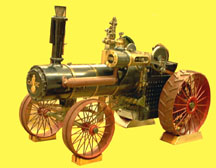
Case Tractor Model
Featuring: Bud Frazier
Membership Information Membership is open to all those interested in machining metal and tinkering with machines. The purpose of the club is to provide a forum for the exchanging of ideas and information. This includes, to a large degree, education in the art of machine tools and practices. There is a severe shortage of written information that a beginning hobbyist can use. This makes an organization such as this even more important. For membership information and forms, call George Carlson at (281) 376-4606.
Notes from the President
By: George Carlson
Every time I come to one of our meeting I see something that surprises
and amazes me. The March meeting was no exception. As usual,
we had our show-and-tell. Bud Frazier, a first time visitor, shows
up with a few projects he has been working on. One of the projects
being a 1/6 operating scale model of a Case steam powered tractor.
What a project! With the exception of a few Iron casting, Bud made
all his own patterns and poured the metal himself. The machine and
sheetmetal work were incredible. As we know, good things take a while.
When finally finished, this tractor should be something to behold.
Bud has been working on this project for 41 years. That alone, I
have to admire.
John Oder did a great job explaining the heat treating and identification
of metals. This, of course, was no surprise, because John has done
a good job in the past. As always, his presentation was interesting
and entertaining. The outdoor heat treating demo was also a lot of
fun. I think I now know what they mean by the color "Straw".
I also want to saw thank-you, John, on behalf of club, for your donation
of all those years of Home Shop Machinist and other magazines. David
Wittaker is busily compiling a list of the periodicals to let the
members know exactly what we have. Talk to David if you would like
to check out an issue or two. (Or in the case of a HSM project, maybe
10 or so issues.)
We are continually searching for various things that the club can put
together to assist and encourage our hobby. Every October we have
a swap meet. This has proven to be a very popular event. Many
of our members are now "On-Line", that is, connection to the Internet.
The Internet has several Swat Meet type sites. The rec.crafts.metalworking
is a newsgroup that allows individuals to post questions and answers pertaining
to metalworking. Ads for used machinery are common, as well as requests
for wanted machinery. There are about 140 (or more) postings to this
group every day.
I think anyone who has used the Internet very much will have heard
of Ebay. Ebay is an auction service that is computer run, and very
simple to use. It is HUGE! Currently there are 1.9 million,
yes million, items up for auction on Ebay. How can you find
anything? Actually, it's easy. There is a search engine on
Ebay that can quickly find auctions that you would find interesting.
I did a search for auctions using the word "Starrett". It turns out
there were 258 Starrett items for auction. WOW!
So, where does this leave us The catch is, that although you don't
have to put up a photo of your item, it sure does make it easier to get
good bids. This is true for Ebay or even our own swap meet on our
web page. We now offer a service to members that allow them to post
images of their stuff on the web. We currently have some extra Web
space (memory), so we can make use of that. Just send me an email with
the .JPG image file attached to the file. I will post the image to
the web space and email the URL (address) back to you. The items
will be removed from the site after 30 days so that space is not eaten
up.
So, if you would like to run an ad on Ebay on the newsgroup, or post
an image of a "whats-it" and ask the newsgroup what it is, then go for
it. Please keep the image files below 70KB because I don't want my
email to get jammed. If you have any questions, please email me at
geotek@wt.net or go to the URL http://web.wt.net/~hmsc/ebay/
Minutes of the March Meeting
Reported by: Keith Mitchell
Chips Meeting - 1:00 P.M. February 27, 1999, Oak Forrest Library
Attendance - 30
In the Chips Meeting the following activities took place.
1. Past Issues of HSM and PIM - John Oder donated two copy paper boxes
of back issues of Home Shop Machinist and Projects in Metal. David Whittaker,
the club librarian, will catalog these issues. Once cataloged, these
will be available for loan from the club library like the tapes and other
publications.
2. Newsletter Articles - Suggestions were requested for newsletter
articles. One suggestion is to add a Question and Answer section to the
newsletter. The following subjects for future newsletter articles were
submitted:
A. Photography techniques for Photographing Projects.
B. Metalworking on the Web.
C. Machine reviews
D. Purchasing used Equipment
E. Book Reviews
3. Newsletter- The need to spread the work on the newsletter was discussed.
Volunteers to prepare the feature articles were requested. Six people have
agreed to prepare articles. They are:
A. April - Tom Moore
B. May - Bill Sperry
C. June - John Korman
D. July - John Lily
E. August - J. D. Wise
F. September - John Lily
In about three months we will again solicit volunteers. In order to
consistently produce a quality newsletter we want to develop a backlog
of newsletter articles. If you have previously submitted an article which
has not been published please get it to Keith Mitchell. If you would like
to prepare a newsletter article, please do so. The only requirement is
that it be an original article, not something directly extracted from the
internet or the work of others. It's perfectly acceptable to refer to that
type of material as long as proper credit is given. Our goal is to use
everything we receive.
We are also developing a list of resources to assist others in preparation
of newsletter articles. These are people who can do word processing, CAD
drafting, photography, etc. to assist others. The goal is to provide assistance
to those who are willing to prepare an article but lack some of the skills
or equipment required.
4. Presentation - John Oder gave a presentation on Heat Treating.
See the following pictures.
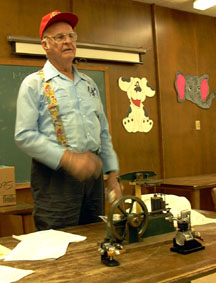
5. Show and Tell - Bud Frazier brought in some of his small engines
and his Case Tractor model. All of his work was very impressive.
6. Address List - At the April meeting we will hand out
copies of the address list
Heat Treating
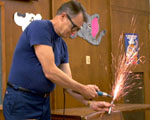
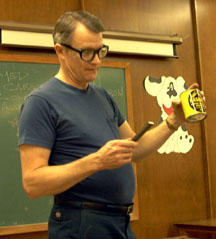
Featuring: John Oder
The photos are of John Oder's presentation on heat treating during the March Meeting. In Photo 1 John is using a grinder to test for carbon content. Low carbon steel produces long spark traces with few stars. Medium carbon steel produces shorter spark traces with more stars. High carbon steel produces short spark traces with abundant stars. In photo 2 John is explaining the use and benefits of case hardening compounds. Although they work, the case is not very deep. John used refractory brick with a propane torch to heatreat various metals. A file was used to test the hardness of the treated materials. He demonstrated how low carbon steels are essentially unaffected by heating and quenching. Medium carbon steels are somewhat hardened by heating and quenching. High carbon steel, drill rod or files, are hardened to the point they cannot be cut with a file. When quenching with water add salt. This helps prevent cracking due to uneven quenching caused by steam bubbles.
Case Tractor Model
Featuring: Bud Frazier
I have been trying to do machine shop work for about 12 years, so you can see I am a beginner. But I have made a few discoveries, which are not in the books, at least not the ones I have been able to get at. I thought I would list some these for the other beginners in the Club. Old hands will think all that follows is obvious, but it isn't, at least not to me.
Every one needs a swarf rake, a 1/4 thick piece of hard wood, say about 2" x 10" with a sort of knife edge on one long edge, and a 8" dowel glued in a hole centered the long way and close to the other edge. This makes it easy to rake the swarf from the lathe into the trash can. Saves on Band-Aids.
Every one has read, I am sure, that you should not put any tools on the lathe bed. And I'll bet that every one has done so anyway. I made a table, just a piece of 3/4 " plywood with a 3/4" cleat in the middle that keeps it between the bed ways. I put my tools on that with a clear conscience. Also, the table makes a great bed protector when installing or removing a chuck. I sprayed my table with clear lacquer for beauty.
The cheapest and best demagnetizer is a Weller type soldering gun. Just pull the trigger to turn the gun on, and insert the piece to be demagnetized and draw it out slowly, keeping the trigger pulled.
I don't even try to grind lathe tools anymore. I use a "Diamond Tool" or carbide inserts. I burned too many tools, and more importantly, fingers trying to learn to grind a proper lathe tool. When I master everything else, I will return to that project.
You can cut almost anything with the little friction wheel on a Moto Tool. Particularly, cap screws. George Carlson convinced me that the carbide cutoff tools which are inserted in thin blades are less likely to chatter, and are not very thick (.087".) Well, I bought one from a catalog, and the blade was 1" wide super hard steel. My tool holder takes an 11/16" cutoff blade. Looking at the blade holders in the Traverse and Enco catalogs gave me no help. These blades are supposed to be held in something called a tool block, whatever that is. Any way, I cut the one inch blade down with my Moto Tool, and finished the job with a cup grinder in the mill. George was right about chatter.
Don't buy anything fancy from Enco. Too risky. Get the item locally where you can inspect it, or order from Traverse and pay a little more.
I put an advice request in the Home Shop Machinist some time ago regarding the advisability of using coolant on my lathe. I got several phone calls in response, but the fellow that I remember best asked me how large my production runs were. After some thought I told him that I usually made two or three items, depending on whether I got it right on the second or third try. He said I probably did not need to bother with coolant. You do want some lubricant for threads and sometimes cut off work.
Silver solder is wonderful. It's very strong, particularly the hard variety, which can be hard to find. You need to use flux, and get the piece red hot, but the solder will suck into the joint. I repaired a broken ignition key, soldering along butted edges, no bevel, no backing. (I filed the edges so they were a close fit.) It worked great. Never did break. I understand you can get several grades of silver solder that melt at ever decreasing temperatures so you can keep adding parts to a piece. I have had fair luck sticking the partially finished part in a coffee can filled with wet sand.
I keep bed way oil in a plastic film can, glued in a steel donut for weight, with an acid brush stuck through a hole in the top.
When you try to thread, say a 1/4 " rod with a 1/4 " die, you find you have a problem. That die does not really want a 1/4 " piece. You need to look up the real diameter in Machinery's Handbook. (For 1/4 " x 28 it is .2423 - .2490. Use .245.)
It is worth while to make tail stock die holders. Usually, it pays to cut threads with a die whenever possible, unless you have a lot of time to kill. And the thread form is likely to be better using a die. Some times it is a good idea to start the thread on the lathe, and finish with a die. If you want a tight fit (not the 75%, wobbly fit from most commercial parts) you need to use the lathe or an expandable die. You can get a die for almost any thread.
You cannot hold a part for threading in a collett unless you use a collett stop, good for short pieces only. Even then it may slip. Threading is hard work for the lathe. You cannot take a normal depth cut. Lots of patience required.
I cannot pick up the index on a partially completed thread when the part has slipped in the chuck. I am sure of this as I have tried many times.
I am also sure I cannot accurately measure the size of a hole. (Within .003.)
CAD drawing is usually not worth the trouble. Get some graph paper with lot of little blue squares, .25" or .10", and draw to scale. The blue won't show on a copy machine if you turn it a little on the light side.
You can make a swell knurled thumb screw with a #10-32 cap screw. Drill a 7.7mm hole in a 1/2" or 3/4 " bar, knurl, and cut off. (I never had any luck with a plain knurling tool in my 10" heavy Southbend lathe. But the squeeze type with two opposed wheels that you screw down on the work are fine.) Press the nice little knurled donut on the head of a screw with a vice or press. I usually make several pieces (the knurled donut) when I do this as I seem to need them all the time.
A set of transfer punches is most handy, not expensive.
Small mill boring bars work fine on a lathe for small holes.
You have to run chucking reamers real slow, or the hole will be over size. I usually turn by hand.
I have had good luck centering a hole through the diameter of a bar with a trick I read somewhere. Drag the work (in the drill vice) under the turning drill, or better, an end mill, so it just nicks the work. Then center punch on the little stripe by eye. For me, this works as well as all but the most careful measurement. Sometimes better.
To drill a back plate for a lathe chuck. (After the plate is turned to fit the chuck.) Start with a drill or rod that is a running fit inside the threaded holes in the chuck. Chuck it in the drill press, and run it into one of the threaded holes in the chuck. Keeping the chuck in place raise the drill, and place the back plate on the chuck. Start the hole in the back plate with a center drill, and then drill the plate through. Enlarge the hole on the back plate to its final size. (The holes on the back plate are not part of the indexing system, they should be a generous fit.) Line up the back plate by bolting it to the chuck using the first hole, and repeat the process.
You have probably heard about pickling a part to remove corrosion. This
means dunking it in an acid bath. I keep a lidded plastic bucket about
1/2 full of dilute acid. I have used sulfuric (plumbers friend) and hydrochloric
(swimming pool muriatic) acids. They seem to work the same for me. Always
add acid to the water, not the reverse, unless you want to get splattered.
I use monofilament fish line to dunk the part. Acid works much faster than
vinegar
.
A stuck chuck can result from taking very heavy or interrupted cuts, spinning the chuck tight against the spindle when installing or, most likely, bruised or dirty threads. Getting it off can be anything from a nuisance to a disaster.
I regularly use the chuck key in the chuck adjustment screws to loosen a chuck for removal. Using the chuck adjustment screws as an anchor for any kind of lever is hazardous if the chuck is tight. For some reason the jaw adjustment screws are usually made of cast iron. If one cracks, you may not be able to buy a replacement. Making a replacement involves making a square socket-head and cutting square threads for a 4 jaw..or cutting a pinion gear for a 3 jaw. A safer method is using an adjustable wrench on one of the jaws. If you apply too much Sunny Jim, you can damage the chuck. You can usually drill a hole somewhere on the circumference of the chuck to anchor a hook spanner. You can get pretty rough with a plain hole without damaging anything. The usual method of restraining the spindle is to engage the back gears without freeing the bull gear. Should you decide to hammer on the wrench, the gears may be damaged. Some lathes provide an independent means to lock the spindle. Use this rather than the gears. There is always a gear on the other end of the spindle to drive the leadscrew. If this gear is removed and a suitable thick bar (several feet long) is drilled to fit the spindle and installed with a key, you can anchor the spindle without damaging anything.
Another option is to use a strap wrench installed around the body of the chuck. You can improvise a strap wrench using a strong belt (from your pants) secured to a lever several inches from the end. If the chuck has a separate backplate, it is possible to separate the chuck. This may involve cutting down an allen wrench and sawing off the screws as they back out. With the chuck proper removed, make a lever with holes to match the holes in the backplate. You can get pretty rough with this if the spindle is anchored at the other end with the lever as above.
Next try differential temperature. Heat the chuck or backplate so it will expand while cooling the spindle to make it contract. If you try just one of these, they both will contract or expand together. Using a suitable piece of tubing for a mold, make several ice cubes that will fill the inside the spindle. As they melt, add a fresh ice. Allow an hour for this. When sweat or frost appears on the backplate or chuck, quickly heat the backplate or chuck with a torch while keeping a bind on the levers. You might as well quit when the backplate or chuck gets too hot to touch. As a last resort, turn the chuck or backplate away. Use care not to touch the spindle. Afterwards, carefully re-screwcut (chase) the spindle threads, polish with a Cratex stick. Always clean and oil both the spindle and chuck threads before installing any chuck.
After numerous bad experiences with stuck chucks, I came up with a way to overcome this problem. I install a thin plastic washer on the spindle before installing a chuck. These washers are cut from plastic about 3/32" thick.. Plexiglass works fine and is available at any lumber yard. Any plastic will work as long as it will dissolve in solvent. After the washers are cut out, cut a dozen "V" grooves across the face on each side with a 3 square file. When the chuck doesn't want to come loose, soak the washer all around with acetone. After about 30 minutes, the plastic is mush and the chuck will be handy.
Tom Moore
March '99
