Volume 1, Number 8 - December 1996
Journal of the Home Metal Shop Club of Houston, Texas. See back page for meeting information.
President - John Korman, V. Pres. Richard Drews, Treasurer - Alan May, Secretary - J.D. Wise
Editor - George Carlson Wk (281)376-4606, Hm (281)376-8307, Email geotek@comwerx.net
General News and Events
The last meeting was held on November 16th at the library. We had a very good turn-out, seventeen people. A few new HSM's as well as quite a few of the regulars. Club announcements in The Home Shop Machinist and Model-Tec are paying off. Lowney brought in the tool post he was building based on the plans in the August newsletter. George Edwards showed some photographs he took while at a show in England. A new visitor, Feroze, brought in a beautiful little rotary table he designed and built. Thanks for sharing your experiences with us.
Home Metal Shop Club -- History & Purpose
By: John G. Korman
While scanning some back issues of the Home Shop Machinist magazine, I came across Alan May's note in "Reader's Forum" section of the Fall 1992 issue. I contacted him and a decision was made to form a metal machining club in the Houston area.
A notice in March/April '96 issue of Home Shop Machinist requested an expression of interest in forming a Houston club for metal machinists. Those responding received a newsletter with additional information concerning the club's formation.
Our first meeting was on May 18, 1996. Although attendance was light because of a conflict with gun club show, those who attended were very enthusiastic. Officers were elected and by-laws approved at following meeting. Membership has steadily increased through notices in newspapers, on the library bulletin board, Home Shop Machinist & Model Tec magazines.
The club's purpose is to provide an opportunity for the exchange of ideas, the sharing of resources, and instruction in metal machining among its members. Experienced and novice members learn from one another. What could be more rewarding or satisfying than sharing with others?
A Neat Christmas Gift
by George Carlson
Here is a neat idea for a shop made Christmas gift for a non-HSM. In the photo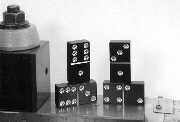 at the right is a few Mil-Spec, NASA Certified Dominos. Made from 6061-T651 Aluminum Bar Stock, these are the UZI of the serious Domino playing crowd. I built several sets a few years back, and had a great time. The full article will be published by Bill Gray in his Metal Web News internet website (http://www.ten.k12.tn.us/~gray). Check there to get all the information, or send me (editor) an SASE and I'll send you a copy of the article I wrote. In short, the blanks are first cut out, grained on a beltsander, and black anodized. Then the line across the center is cut. The dots are cut using a 1/4" ball end mill. They make a good loud sound when slammed down on the table!
Dial and Test Indicators
by George Carlson
In professional metal working books, dial and test indicators are shown in-use extensively for inspection and gauging. They do not, however, do a very good job of showing how these devices can be of great help during the machining process.
Although it may not be entirely correct, Dial Indicator refers to the type of indicator with a plunger. Test Indicators are the devices with a lever arm. Dial Indicators measure distances at a right angle to the dial. They generally have a fair amount of measuring range, several inches in some cases, and have large dials usually at least two inches in diameter. Test Indicators are used to measure small changes in distance, usually 0.030 inches or less. The use of a lever arm allows the Test Indicator to be used in places where Dial Indicators could not be used. Your shop should have at least one of each type of indicator in it's arsenal.
Dial Indicators
The photo at the right shows three sizes of Dial Indicators ranging from 0.250 inches to 2 inches of travel. As you can imagine, sometimes the small travel indicator can be handy in tight spots. The most common size has one inch of travel. These can usually be purchased for as little as $10.00. When buying a Dial Indicator, check to see if the plunger moves freely without binding. The needle should return all the way to the full CCW position, even if the plunger is released very slowly. This is a good way to check the signs of rough gears and poor quality. Expensive name brand indicators are made to finer tolerances and generally require lighter spring pressure to return the plunger to it's home position. The truth is, both make the same noise when dropped on a concrete floor, only the owner sounds different. For most shop work, use the cheap ones, for more exacting work, such as on the surface plate, use a Starrett ,Mitutoyo, or other fine quality indicator. Cheap indicators are handy for permanent mounting to various fixtures. The backs can be removed and altered to fit your requirements. Posts, magnets, tool bit shanks, and other items can be fastened to the back for special measurement needs.
In the milling machine, Dial Indicators can be used for precise positioning of the table as shown in the photo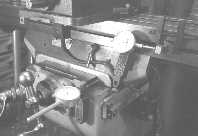 to the right. Magnetic holders can be used, but shop made clamp-on holders are usually better. Use you imagination to solve the mounting problem. Once a good mounting system is devised, that craving for a DRO will subside a bit. Extreme precision on jig and horizontal boring machines was achieved using gauge blocks and dial indicators long before Digital Readouts were invented. Special attachments that allow a Dial Indicator to be used for measuring quill travel is available. They can be very helpful when precision depth cuts are to be made.
One source of error in making measurements with a Dial Indicator is due to the axis of the plunger not being exactly parallel to the machine travel. This is called Cosine Error because the dial indicator shows not the actual distance moved but the actual distance times the Cosine of the angle between the plunger axis and machine travel. Although this sounds serious, it is really not too much of a problem. This is because the error, for even two degrees of miss alignment, is less than .001" in 1.500" (error .06%). When making large movements it is best to use the method described below for the lathe.
In the photo
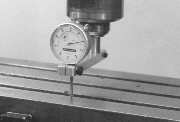 at the left, a milling machine spindle is being "Trammed-In", or checking to make sure it is perpendicular to the table. This is a normal exercise on a Bridgeport type of machine. If you build a fixture for "Tramming", make sure the radius will allow front, back, left, and right measurements without falling off the table or in a T-slot. Mill Drill owners may want to do this and shim the column mount if necessary.
Dial Indicators find a wide variety of use on the lathe.
The photo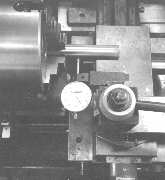 at the right shows an indicator used to set a work-piece true in the four jaw chuck. The general procedure is as follows:
- Mount the work-piece in the chuck as accurately as your eyeball will allow.
- Set-up the Dial Indicator on the tool post (or whatever works) so that the plunger is fairly parallel with the crossfeed, and the point is close to center. The plunger will ride directly on the work piece or on a Pump Center (shown in the September 1996 newsletter).
- Rotate the chuck and find the low spot (fully CCW on the needle), and the high spot.
- Go to the low spot and set the dial to zero.
- Now move the chuck to the high spot. Be sure to count the revolutions on the dial if necessary.
- Take the total movement and divide by two.
- Now turn the dial to the resultant number. E.G. if the dial read 0 at the low spot and .096 at the high, .096 divided by two is .048, set the dial to .048.
- This should now be the center of the error, when rotating the chuck, the low spot and high spot should show the same amount of deflection on the dial.
- Now rotate the chuck until a low spot is found, and one of the chuck adjustment screws is at 9:00 (as viewed from the front of the chuck). Loosen the 9:00 screw slightly, and tighten the 3:00 screw until the indicator reads zero.
- Rotate the chuck 90 degrees toward the next low spot, either CW or CCW depending on the position of the low spot. Adjust the screw as described in 9 above.
- If you are lucky, the work-piece should run true. If not, and that is normal, do the above procedure again. Eventually the error should disappear.
- Tighten the chuck jaws to full tightness and make sure to check one last time before making any cuts.
The photo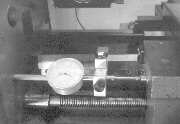 on the right shows the use of a Dial Indicator for measuring longitudinal travel. Every lathe is different so you may have to design your own holder, but the ability to accurately measure is well worth the effort of designing a holder. A steel button was epoxied to the side of the apron to enhance accuracy. The apron has a very rough finish making this necessary. In the photo, a 2" travel indicator is being used. These devices are quite long and I thought I would not be able to use one close to the headstock of my lathe. I had my lathe several years before I realized that I could build a holder that allowed me to remove an oil plug on the side of the gearbox and let the top end of the indicator go inside the hole. I'm now a happy camper! The next photo
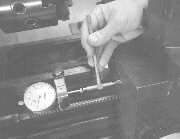 shows a technique for making very accurate movements using a short stroke Dial Indicator. In the photo a telescoping gauge is set to the desired distance using a micrometer or caliper. The carriage is located at the position of the right hand cut. The Dial Indicator is zeroed out with the gauge in place, and the first cut is made, if necessary. The carriage is then moved to the left until the indicator again reads zero. The final cut is made. This method can also be done using inside micrometers, gauge blocks, on adjustable parallels. Note that the normal indicator point was replaced with a flat bottom point. A general rule is that measurements should be made with point against flat, not point against point or flat against flat. Kits of dial indicator points are inexpensive and definitely useful.
The amount of cross-feed can be easily measured by using a Dial Indicator. See the photo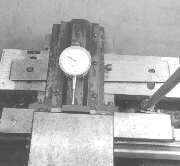 at the right. The trick is finding a good way to mount the indicator. This indicator has a large round magnet epoxied to the back. The magnet does affect the drag in the indicator to some extent. It would probably be best to use a cup type magnet assembly. They will hold very well without affecting the Dial Indicator. Again, each make of lathe is different, use your imagination and build a holder to suit your equipment.
Test Indicators
Test Indicators are almost never used to make absolute measurements. Instead, they are used to make measurement where a "return to zero" is needed.
The photo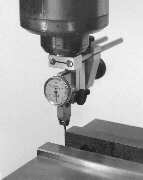 on the right shows a test indicator being used to set the vice square on a milling machine. To set a Kurt type vise square very quickly, use the following procedure:
-
Fasten the vise to the table by tightening the left hand screw pretty tight, but leave the right hand screw just barely tight.
- Use a soft mallet to bump the vice so that it is fairly square. (via eyeball or try-square)
- Mount a Test Indicator in a collet or chuck.
- Zero the indicator at the far left side of the vise. (always lock both X and Y table movements before reading the indicator, this removed lash in the ways)
- Move the table left about one inch.
- Lock the table and observe the reading.
- Thump the table and bring it past the zero to about the same amount it was offset. E.G. If the indicator read +.012, bump the vise for a reading of -.012.
- Re-Zero the indicator
- Unlock the table and go back to the original spot. Re-lock the table.
- The zero is probably pretty close. Re-Zero and move to the right side of the vise.
- A small bump to zero the indicator here is all that should be needed.
- Go back and check out the left side.
- Don't forget to tighten the two hold-down bolts.
With practice, you should be able to get it right the first time. Just remember to lock the table before reading the indicator or bumping the vise.
In the photo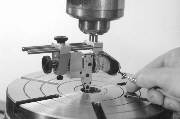 at the right, the center of rotation of a rotary table is being found. The device used in the picture is detailed later on. Note that a small mirror comes in handy for reading the indicator when it faces the rear. The goal here is to make the Morse Taper in the center of the table, concentric with the milling machine spindle. When doing this kind of alignment, use the same technique as used for truing work-pieces in the four jaw. Find the low spot, zero, find the high spot, divide by two, move table until X and Y are true. It goes very quickly once you get the hang of it.
Using Magnets in the Home Shop
by George Carlson
I have found many uses for simple magnets in my shop. These are the small low-cost type found at surplus stores such as Electronic Parts Outlet and Wholesale Tool. The following list may help give you a few ideas for using magnets in your shop:
- Holding drawings to the machine table while working. This keeps the drawing from falling on the floor or getting blown away. Having the drawing right near where the work is being done is very convenient.
- A small magnet placed on top of the milling machine vise can be used to keep track of center drills, drill bits, and taps, while multiple holes are being drilled and finished.
- A magnet placed in the bottom of the cutting fluid cup, helps hold the brush in the cup, (if you are using the cheap metal handled acid brushes). The magnet will also serve to capture steel chips and, if the cup is plastic, hold it down on the machine table.
- The key for the chuck
 in a tailstock can be stuck to a magnet on top of the tailstock. Drill bits, etc. can also be stored here and not lost in the chip tray.
- Tools such as screwdrivers can be easily magnetized by rubbing them across a magnet a few times. Great for holding a screw until you can get it started.
- Placing a magnet in a small pan will help keep track of small parts when you are disassembling complex mechanisms.
- A magnet placed on the headstock
 is a good place to keep a 6" scale. See photo at right.Magnets make a good surface to measure against with a Dial Indicator. Look back at the photo of the Dial Indicator used on the crossfeed of a lathe. A magnet is stuck on the back of the cross slide to give the indicator point a reliable surface to operate on.
Magnets primarily come in three basic types, Metallic (Iron, Steel or Alnico), Ceramic, and Rubberized. The ceramic magnets are very strong and hard. They are also brittle. Metallic magnet are also quite strong and they do not have the same problem with brittleness as the ceramic magnets, but, quite often they can rust and stain you equipment. Rubberized magnets are not very strong but they have other worthwhile traits. They are soft and will not damage equipment if caught on jammed in a bad place. They also will not mar the surface they are on, and they do not cause rust stains.

 at the right is a few Mil-Spec, NASA Certified Dominos. Made from 6061-T651 Aluminum Bar Stock, these are the UZI of the serious Domino playing crowd. I built several sets a few years back, and had a great time. The full article will be published by Bill Gray in his Metal Web News internet website (http://www.ten.k12.tn.us/~gray). Check there to get all the information, or send me (editor) an SASE and I'll send you a copy of the article I wrote. In short, the blanks are first cut out, grained on a beltsander, and black anodized. Then the line across the center is cut. The dots are cut using a 1/4" ball end mill. They make a good loud sound when slammed down on the table!
 at the right shows three sizes of Dial Indicators ranging from 0.250 inches to 2 inches of travel. As you can imagine, sometimes the small travel indicator can be handy in tight spots. The most common size has one inch of travel. These can usually be purchased for as little as $10.00. When buying a Dial Indicator, check to see if the plunger moves freely without binding. The needle should return all the way to the full CCW position, even if the plunger is released very slowly. This is a good way to check the signs of rough gears and poor quality. Expensive name brand indicators are made to finer tolerances and generally require lighter spring pressure to return the plunger to it's home position. The truth is, both make the same noise when dropped on a concrete floor, only the owner sounds different. For most shop work, use the cheap ones, for more exacting work, such as on the surface plate, use a Starrett ,Mitutoyo, or other fine quality indicator. Cheap indicators are handy for permanent mounting to various fixtures. The backs can be removed and altered to fit your requirements. Posts, magnets, tool bit shanks, and other items can be fastened to the back for special measurement needs.
 to the right. Magnetic holders can be used, but shop made clamp-on holders are usually better. Use you imagination to solve the mounting problem. Once a good mounting system is devised, that craving for a DRO will subside a bit. Extreme precision on jig and horizontal boring machines was achieved using gauge blocks and dial indicators long before Digital Readouts were invented. Special attachments that allow a Dial Indicator to be used for measuring quill travel is available. They can be very helpful when precision depth cuts are to be made.
One source of error in making measurements with a Dial Indicator is due to the axis of the plunger not being exactly parallel to the machine travel. This is called Cosine Error because the dial indicator shows not the actual distance moved but the actual distance times the Cosine of the angle between the plunger axis and machine travel. Although this sounds serious, it is really not too much of a problem. This is because the error, for even two degrees of miss alignment, is less than .001" in 1.500" (error .06%). When making large movements it is best to use the method described below for the lathe.
In the photo
 at the left, a milling machine spindle is being "Trammed-In", or checking to make sure it is perpendicular to the table. This is a normal exercise on a Bridgeport type of machine. If you build a fixture for "Tramming", make sure the radius will allow front, back, left, and right measurements without falling off the table or in a T-slot. Mill Drill owners may want to do this and shim the column mount if necessary.
 at the right shows an indicator used to set a work-piece true in the four jaw chuck. The general procedure is as follows:
 on the right shows the use of a Dial Indicator for measuring longitudinal travel. Every lathe is different so you may have to design your own holder, but the ability to accurately measure is well worth the effort of designing a holder. A steel button was epoxied to the side of the apron to enhance accuracy. The apron has a very rough finish making this necessary. In the photo, a 2" travel indicator is being used. These devices are quite long and I thought I would not be able to use one close to the headstock of my lathe. I had my lathe several years before I realized that I could build a holder that allowed me to remove an oil plug on the side of the gearbox and let the top end of the indicator go inside the hole. I'm now a happy camper! The next photo
 shows a technique for making very accurate movements using a short stroke Dial Indicator. In the photo a telescoping gauge is set to the desired distance using a micrometer or caliper. The carriage is located at the position of the right hand cut. The Dial Indicator is zeroed out with the gauge in place, and the first cut is made, if necessary. The carriage is then moved to the left until the indicator again reads zero. The final cut is made. This method can also be done using inside micrometers, gauge blocks, on adjustable parallels. Note that the normal indicator point was replaced with a flat bottom point. A general rule is that measurements should be made with point against flat, not point against point or flat against flat. Kits of dial indicator points are inexpensive and definitely useful.
 at the right. The trick is finding a good way to mount the indicator. This indicator has a large round magnet epoxied to the back. The magnet does affect the drag in the indicator to some extent. It would probably be best to use a cup type magnet assembly. They will hold very well without affecting the Dial Indicator. Again, each make of lathe is different, use your imagination and build a holder to suit your equipment.
 on the right shows a test indicator being used to set the vice square on a milling machine. To set a Kurt type vise square very quickly, use the following procedure:
 at the right, the center of rotation of a rotary table is being found. The device used in the picture is detailed later on. Note that a small mirror comes in handy for reading the indicator when it faces the rear. The goal here is to make the Morse Taper in the center of the table, concentric with the milling machine spindle. When doing this kind of alignment, use the same technique as used for truing work-pieces in the four jaw. Find the low spot, zero, find the high spot, divide by two, move table until X and Y are true. It goes very quickly once you get the hang of it.
 in a tailstock can be stuck to a magnet on top of the tailstock. Drill bits, etc. can also be stored here and not lost in the chip tray.
 is a good place to keep a 6" scale. See photo at right.Magnets make a good surface to measure against with a Dial Indicator. Look back at the photo of the Dial Indicator used on the crossfeed of a lathe. A magnet is stuck on the back of the cross slide to give the indicator point a reliable surface to operate on.