Vice President- Dennis Cranston,
Treasurer - Tom Moore,
Secretary - Dick Kostelnicek
Editor - David Whittaker,Jan Rowland, and...
Since Vance is on one of his overseas jaunts, I am going to fill in as guest 'Note' provider.
It was interesting at the last meeting during the presentation to see
the fall and rise of enthusiasm when the subject changed from viewing craft
results to discussing fabrication techniques. I admit that some of the
stuff had the Mego effect'. That's short for My Eyes Glazed Over). Some
of the fabrication methods, however, were novel. While lost wax investment
casting could be waved aside as 'too small for men with 13" lathes', the
skills can be used for items closer to what we are used to. Example, This
Old House last Sunday had Steve Thompson visiting a lost wax investment
casting operation using jewelry techniques with 12" by 24" flasks and casting
bronze for door hardware. Many of the methods used in the art world could
be used in home shop projects, if not to make the item, perhaps to provide
the finishing detail to really make a project stand out. Some of our projects
could be elevated from 'neat' to outstanding by the application of a little
of this 'art'.
Stewart Murphy volunteered to be the webmaster for the club's web site.
Dennis Cranston showed a prototype brochure to be left with various
vendors in order to advertise the Home Metal Shop Club to the public.
Bill Swann showed a four-inch diameter silicon boule used in the manufacture of semiconductors. Try chucking that and pulling off a chip!
Jan Rowland showed a Sears grinder he had modified with a diamond-grit face wheel used to dress brazed carbide tool bits, or some insert-types. Jan incorporated a slotted table with miter gage with 7° sloping sides WRT the face wheel, for holding lathe-tools for clearance-angle Kostelnicekgrinding
Dick Kostelnicek showed a home brewed T-slotted sine plate-- very nice work!
Ed Gladkowski displayed a self-aspirating flame burner that he
fabricated.
I always tell folks who ask where/how/why I got started in this making of one-each application-specific machines (well, sometimes three) that the main impetus is laziness! When a particular task is a tad too tedious to be entertaining beyond the first half-hour, it is then time to quickly figure out how to home-brew a machine to do that job!
I was once in the pipe organ manufacturing business, and a pipe organ is basically a very complex machine, made primarily of wood. Custom wooden finery such as drawknobs is traditionally done by "artisan" by hand; thus, one can well-imagine the variability, piece-for-piece. Thus, the "DK Lathe" was conceived. HMSC members who have attended meetings in the latter half of 2000 would have seen the photos of the work-in-progress I have posted in the meeting-room, just for conversation-purposes, of the newest two "CNC DK-Lathes". There are copies of one of the completed, but then, not-yet-running machines on the e-groups sites those of us with Internet capabilities may have seen. This could become a "long story", but here, I am talking only about the fabrication of the chassis upon which an the moving parts and paint are installed.
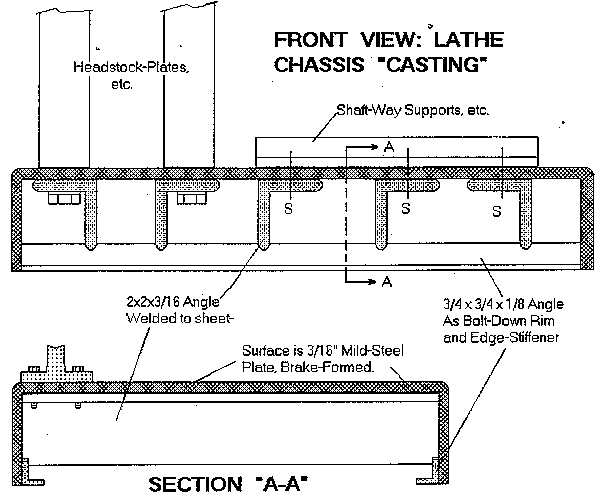
In a conventional lathe, the "bed" would usually be cast-iron with hardened and ground ways, an integral part of that casting. But obviously, the home-shop is not equipped to custom-cast such complex shapes for each design the inventor dreams up. So, "weldments" are a good, attractive, solid, and affordable alternative! Here, I include a "Alliedfont view" and an end-section-view of this chassis (not to scale, for clarity of purpose, here). I had a formed "shell" made by Allied Instruments here in NW Houston, a very fine and well-known maker of custom "electronic enclosures" of every sortactually, anything "sheet-aidmetal, requiring bending, folding, punching, drilling welding, perforating, etc."of 3/16" thick cold-rolled mild-steel sheet. This shell is about 14 x 32 x 2x2". I TIG-welded the corners closed, and then welded-in several 3/16 x 2 x 2" angle irons across, inside, as implied in the drawing. However, note: Seal-welding, even ends-only, of such a thing, into only 3/16" housing, would result in disfiguring "warping" as the welds cooled, so, I use a "spot-welding" technique which surely must be common, "out there", though I have never seen it done anywhere else: I drill 1/2" holes strategically in the web which web be flat on the sheet-stock, and weld through those until the hole is just-full. This is stronger than a bolt, but has neither "head" nor nut! (It is also rather permanent, so this technique requires a bit of forethought!) I also weld at least the "corners" on the ends of such. Once I weld-in the "rim angle" (the 3/4" angle shown), I put the chassis on the mill-table, top-down, and mill these rims equal and flat, all around. Oh, I forgot to mention, before I weld that angle along the rim, I drill the web at logical places and intervals, tap the holes, and then, using a "sacrificed" bolt, I screw-on hex-nuts on the top side of the web, and tack-weld those on. Then, remove the bolt, and use it for the next nut, etc., until all are done. This gives a strong 'pre-threaded" means of mounting the chassis, without having to resort to Gremlins to install the nuts "down in there".
These "stiffener-angles" are not only placed at basically even-intervals; they are also strategically located for receiving the fasteners for the parts mounted onto the chassis, above. The holes for the 1/2" bolts for the headstock-plates are simple Wed-through, but the holes for the screws "S" are drilled and tapped. As one can see, some thought and preparation is often needed for some details before welding things up! The small angles interfere with the corners of the large angles, as can be seen, so, some "nicks" have to be sawn or ground on these web-corners. These spots can then be welded-over, after assembly, making all very stiff, again.
The first such machine I made in '79 was built on a chassis I made of
a scrap of 12" x 3" hot-rolled channel with a 1/4" web. I welded-in angles
in that as shown here, as well. Very heavy! But a bit rough, so, some surface-preparation
was necessary on that early one that is not needed when the part is made
as indicated here.
Frank Goss - Houston Metal arts Guild
Val Link - University of Houston
Frank and Val showed items of jewelry that they had created by using several techniques. The most popular method is the "lost wax technique" This involves creating an original pattern from carvable wax, which may involve both hand and machine shaping. The original pattern is then covered with a castable refractory or investment. After the investment cures, the wax is melted out (lost) from the investment. A molten material for the master pattern is then poured into the investment, being usually silver or brass. After cooling and removing the investment coating, a RTV (room tempetaure vulcanizing) mold is made from the metal master pattern. Multiple production patterns are formed by pouring wax into the flexible RTV mold. The lost wax process is repeated on the production patterns using noble metals such as sterling silver (925 sliver - 25 copper) or gold for the finished jewelry items.
Other jewelry forming processes include "raising" or hammering sheet
metal over anvils and "die electroforming", or selectively plating metal
onto conductive paint covering a pattern. Masters dies for old phonograph
records were produced from wax masters in this fashion.

