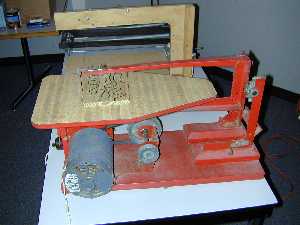
Homebrew jig saw by Art Voltz
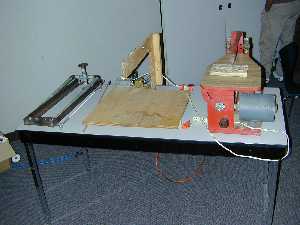
Art Voltz Hot wire styrofoam cutter on left

Bob Lester's toolpost grinder
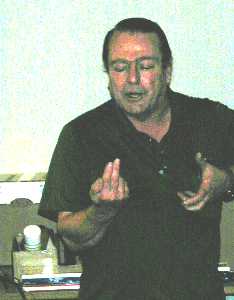
Art Voltz presentation on Pattern Making
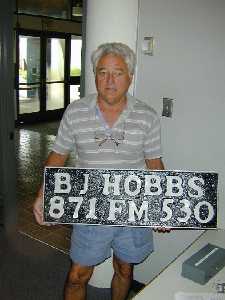
Billy Hobbs cast aluminum plaque
Volume 5, Number 7 - July 2000
Journal of the Home Metal Shop
Club of Houston,
President - Vance Burns, V. Pres.- Dennis Cranston,
Treasurer - Tom Moore,
Secretary - Dick Kostelnicek, Editor - David
Whittaker
Notes From The President
by: Vance Burns
The elections are over and I want to thank all who voted against me, better luck next time.
The June meeting featured Art Voltz, and what a splendid job he did.
Art's presentation was superb, and his excellent graphics and abundant
examples taught us more about pattern making that I ever thought possible.
It's meeting like
this that will convince all who attend, that HSMC is a fine club.
John Hoff voiced a bang-up idea and it merits further discussion. In
a nut shell, John proposed a club project, a joint effort to produce a
functional device from the efforts of cell groups within the club. If I
understand it correctly, John is proposing we pick a project, e.g. a tabletop
Sterling Engine, and sketch out the parts needed. Each cell group would
then pick a
component, tool up and product it in mass. If we work it correctly,
those with aspiration and few tools could be mentored by those with the
proper shop equipment. Let's hear from John and others.
We have the ever ready Tom Moore for this months presentation, and we need a program for August. Any suggestions? Be sure to let us know at the July meeting.
One other matter I?d like to mention is the presentation formats. Art certainly set the high water mark for preparation, but I'd also encourage the war stories, the history of our craft. Many times I have set in rapt attention while you guys chatter about your experiences. In fact, I thing that's the best part of our get-togethers. Don?t be fearful of taking on a presentation with little more than your memories. If you have artifacts of your past, all the better.
Vance
June Business Meeting Minutes
By: Dean Eicher
Chips Meeting - 1:00 P.M. June 17, 2000, Collier Library
Attendance - 39, with one first time attendee
In the Chips Meeting, the following activities took place.
1. Newsletter Editors
- David Whittaker and Bob Lester will be helping Keith Mitchell as newsletter
editors.
2. Election of Officers
- Vance Burns was elected President in a close vote, Dennis Cranston is
our new Vice President, and Dick Kostelnicek became Secretary when his
opponent withdrew, and Tom Moore was elected Treasurer.
3. Feature Presentation
- Art Voltz presented an introduction to pattern design for castings. He
talked about design rules, prototyping and the design process. Sand, shell,
die, permanent mold, centrifugal, ceramic mold, plaster, investment lost
wax, and solid ceramic mold casting techniques were discussed. Art told
us about his seven rules of casting design: 1. Start out fresh, 2. Establish
key points on casting, 3. Connect key points, 4. Check stresses at critical
locations, 5. Strengthen with ribs, corrugations, and dimples, 6. Smooth
out sharp corners, 7. Make sections uniform. He also talked about traditional
tools for making wood patterns, types of wood to use materials for fillets
and wood coatings. Topics such as draft, metal shrinkage and special techniques
including hydrocal plaster, and silicone and urethane rubber and plastic
foam for mold making materials.
4. Tom Moore - brought
oilite bronze material for sale, a set of Starrett screw slotters, an adjustable
height filing rest/guide for his lathe, and copies of the filing rest article
from Model Engineer magazine.
5. Joe Scott - brought
pictures of a Sears drill press he adapted to his lathe for cross drilling
and cutting screw slots. He offered to bring quart containers full of phosphate
liquid for treating metal to interested club members. He also brought two
butt plates for a gun, one of which was black phosphate.
6. Jan Rowland -
brought pictures of his home brew CNC lathe in various stages of construction.
7. Rich Pichler -
brought an article on a multiple spindle gang-drilling machine.
8. Bob Lester - brought
a right angle drive demonstration device that does not use spur gears.
He also brought homemade tool post grinder made from a small motor.
June Meeting Photos
|
Homebrew jig saw by Art Voltz |
Art Voltz Hot wire styrofoam cutter on left |
|
Bob Lester's toolpost grinder |
Art Voltz presentation on Pattern Making |
|
Billy Hobbs cast aluminum plaque |
What is so beguiling about the Japanese sword; is it the sword's subtle lines and graceful geometry, the rich history and myth? Could it be the Samurai himself?
The History
Japanese culture is a treasure trove for the Anthropologist and the
engineer alike. The sword is an important part of the history of the small
island nation. Although not conceived there, the Japanese art and craft
of the sword set the standards by which edged weapons are judged today.
It is uncertain just when the unique sword developed, as scholars readily admit to influences from the cultures of China and Korea. The Chokuto (straight sword) was in common production in the late 200's. By the late 800 to early 900's, foreign influences had all but disappeared, as had the desire for them. About this time the upswept shape was defined in the Tachi or "Long Sword" sporting a cutting edge of 25 to 31inches. This sword, carried in an edge down scabbard, was suspended from the sash by "sword furniture" much like the European cavalry sword.
In the 1500's, the martial tactics required to deal with invading forces evolved the classical shape associated with the Japanese long sword, aka "Katana". Shorter than the Tachi (edge 20" to 24") this sword was worn edge up, with the saya (scabbard without furniture) thrust into the sash alone or with a Wakizashi or "short sword".
The Culture
Japan has taken great care to preserve the history of the sword; the
practice of sword appraisal is as old as the sword itself and records exist
as far back as 1315. In 1719 the Hon'ami family, hereditary sword-appraisers
to the Shogunate since the 1200's, obeyed a decree and produced a catalog
of all the famous swords in Japan. Japan's singular regard for the sword
has preserved the craft, as well as many fine examples.
With sword lore and reverence so well defined in the Japanese culture,
many makers are household names. Many smiths and their swords are considered
"Official National Treasures" and are the subject of ongoing research.
There are, and were, many thousands of swordsmiths, representing centuries
of production, which are studied and documented. The estimates of swords
produced range into the millions.
The Elements
The pre-industrial smiths of all nations had the same basic challenge, obtaining raw materials for their work. Raw material to our generation means bulk, unfinished material. Our forerunners knew metal came from crude, unrefined ores and iron bearing sands - raw material.
Japanese smiths were blessed with available raw materials and learned to make simple steel. The effort was massive, so smelting operations were often collectives.
The smelter, or tatara, was a large open furnace - a box approximately four feet high by five feet wide, and fifteen feet long. A fire was started with charcoal, and when the time is right, layers of charcoal, then iron rich sand were laid in. This continued for three days, and reached temperatures of 2700°F through the use of ingenious bellows. The entire tatara was allowed to cool for several days before disassembly. The process consumed 13 tons of charcoal and 8 tons of water-winnowed iron sand. A typical payload was 2 tons of metal, in varying states of carbon content. On occasion the metal was consistent and of high enough quality that it was impossible to break up and remove. A few excavated sites attest to this debacle.
This classical method is still practiced to produce the material demanded by the serious sword connoisseur.
The Construction
The product of the smelter, tamahagane, is a dense black substance with
a coal like appearance. The trained eye of the smith sorts the nuggets
by carbon content judging color & texture, a simple task given his
ten-year apprenticeship.
The highest carbon content pieces (1.0 to 1.5%) are flattened as much
as possible, fracturing easily - even though hot from the forge. Those
that do not fracture are dipped in water and broken into smaller wafers.
A steel plate fixed to a long rod is stacked with 6 to 7 pounds of metal.
Wrapped in rice paper, and coated with a slurry of clay and rice straw
ashes, this block is returned to the fire and brought to a white welding
heat. Once the smith is satisfied that the billet is uniformly heated and
at welding temperature, the whole is removed from the fire and quickly
placed on the anvil and simultaneously struck lightly with the hammer.
This process is repeated until the smith is sure the mass is well fused.
The next step is the refinement of the billet. Although fused, it still contains voids, and impurities. To purge the billet and blend the steel, the bar is repeatedly drawn out by hammering, cleaving, folding and then re-welding. Due to loss through scale, a smaller billet is produced, approximately 3 to 4 pounds of lower carbon (.6 to .7%) steel.
Japanese smiths were quick to notice the effect this method had on the steel, and exploited the process to enhance the beauty and mysterious qualities of the sword.
The Strength
European swords were skillfully made and wonderfully sharp - for a while. European sword philosophy held that the sword was effective as a deftly welded wedge. Edge geometry was important, but toughness was a life or death issue. Most swords were unhardened. Four or five pounds of metal rapidly decelerating into your torso took its toll. The shock resistance of unhardened metal meant a mistake didn't cost you your life.
The Japanese wanted a superb cutting tool, and knew only a rock-hard cutting edge could deliver. These swords cut with magical simplicity, but unexpectedly became shorter swords. They knew that only a hard edge would give them the efficiency they sought, but the loss of toughness was unacceptable.
Whether from a desire to economize on materials or a genuine genius of material science, the swordsmith experimented with various methods of utilizing softer, tougher material in non-critical areas of the blade. There are many variations on this theme, some quite complex. The most familiar method resembles a nested "double V" in cross section. The inner "v" is a low-carbon steal core surrounded by the outer "V" of high carbon steel. When properly hardened, the core steel was tough and the skin was flint hard. This proved to be a serviceable sword, it could absorb incredible shock, even crack, and still remain intact.
The Magic
Even though the sword was now tougher, cracking and chipping, while less likely, was still inevitable. When sword met sword, something had to give. Chips developed into cracks that eventually weakened the spine enough to snap the sword in two. Understanding the metallurgical benefits gained from the core steel modifications, the smith wanted to bring that toughness to the bulk of the blade. Methods that incorporate more soft material, as in a hard edge welded to a soft sword body, met the challenge, but didn't come close to the high performance the smith knew his clients demanded. Such swords bent easily, and cut erratically. If the smith could refine his control of the material, putting toughness where needed, he would be able to create the ultimate weapon of its age.
Controlling the toughness in the metal meant controlling the transition when hardening. Hardening of the steel was revolutionary in its self, now the smith wanted to understand and master the process. The swordsmith knew that controlled hardening was the key, and tested techniques of insulating the metal from the chilling effects of the quench. The smith had to determine how much insulation was required and perfect a formula that would adhere to the sword during the rigors of transition heating and sudden quenching. This knowledge was a closely guarded secret.
Once the smith had a functional insulation method & material, he could control where the hardening took place, and how hard the metal became. Since Japanese swords are never tempered, this control was critical.
Rather than have the hardness throughout the outer jacket, or in striations, the smith was free to manipulate the tougher structure, moving it near and even down to the edge thereby creating zones of hardness encompassed and/or segmented by ductile material. This solved almost all the problems encountered by the smith.
The Beauty
The swordsmith and polishers (a separate trade) noticed that this new technique created interesting patterns that could be reproduced. As polishing improved, some magnificent effects created in the steel came to the surface. A huge vocabulary has evolved to enumerate these special changes in the crystalline composition of the steel.
The Beast
To accomplish these effects, the smith had to complete the forging operations and end up with a basic sword blank that was structurally sound, devoid of defects and impurities, contained the appropriate carbon content, and hadn't lost too much material through fire scale. A massive effort so far.
The functional shape was visible but the sword was still strait, and enveloped in a hard, thick layer of fire scale. This tenacious material is murder on files, and sandpaper - you might as well use a rock - which is what they did. Today we user grinders and metal cutting wheels. An alternative, hand stoning, is time consuming, but effective and allows better control of edge geometry, while gaining a feel for needed refinements. A talented swordsmith showed me how to use the cheap import carborundom sharpening stones. They work best when wet.
Roughly polished to near perfect dimensions the smith then applied his insulative material to the sword blank. The major schools of sword craft had distinctive styles in the clay insulation application that became recognizable signatures.
Once the sword was properly protected, and the desired designs incorporated into the applied insulation, the mass was heated to the transition point of the steel - the austenitic point where the metal becomes a non-magnetic solution of ferrite and carbon. This was done within the forge in the proximity of the quench tub, a vat of water prepared to receive the glowing hot beam.
They sword eventually reached the correct temperature and was quickly moved above the water. For some effects, the sword was held above the water until the shadows ran, an eerie pulsation of light as the metal approaches the transition temperature. More often the sword was plunged into the bath at full heat - a sizzling, hissing serpent. As the sword suddenly cooled, it shrank, certainly in all dimensions, but most significantly in length - at least the portions of the sword that had not changed into rock hard martensite. The areas protected by the insulation didn't convert to martensite, but began to contract - pulling against the unyielding edge, thus causing the sword to bow producing the upswept shape associated with the Japanese Katana.
This was the moment of truth, the geyser of steam, thrashing water,
noise, and vibrating tongs - just an overture to the feared musical note
of the sword - should it fail. Ever attentive, for it could come at any
moment, the smith listens helplessly for the telltale ping of the metal
as the shock tears at the sword. I've seen it happen; the quench takes
it's toll and the clear bell tone cuts through the chaos as the hardened
edge snaps and tears itself from the body of the sword. Villainously lovely
in its appearance, the crack runs up from the hardened edge to the boundary
of the hamon where the white martensite transitions to the softer, darker
perlite. Here it stops only to turn and rivulet it's way along laterally
for several inches in either direction, a horridly comical, twisted smile
that reduced effort to futility.
The skill of the smith is tested with the birth of each sword. Fortunately
the hard work and skill are not frequently wasted and a new creation emerges,
born of sweat, fire and hard won experience. A supreme example of craftsmanship,
which when weilded in the hands of an expert, is a symbol of art and war.
