Volume 5, Number 6 - June 2000
Journal of the Home Metal Shop
Club of Houston,
Notes from the President
By: Keith Mitchell
The nominating committee has completed their work. Our goal was to nominate
people who have the commitment to serve. Any of the candidates will do
an excellent job. The elections will be held at the June meeting. Below
is a listing of the candidates.
President
Vance Burns
John Hoff |
Vice President
Dennis Cranston
Billy Joe Hobbs |
Secretary
Doug Chartier
Dick Kostelnicek |
Treasurer
Tom Moore
Ron Blair
Bob Lang |
The June meeting presentation will be by Art Voltz on Patternmaking.
I have confirmed this with Art so it's as real as I can make it. Sorry
about the misinformation last month.
At the next meeting there will be a slight change in the program. The
Foundry Group will meet at the Collier Library at 11:30 followed by Chips
meeting at the same location at 1:00. The business meeting will be sandwiched
somewhere between the foundry meeting and the regular meeting. In the past
we have had to ask those not interested in the foundry meeting to leave
the meeting room in order to start the foundry meeting. This cut short
the discussions which follow the regular meeting and form a healthy part
of the meeting format.
During the last meeting we had a report from the committee studying
the aspects of accepting remote members. There was a lively discussion.
It was agreed that members who move away from the area will remain members.
Bill Laird is the member who initiated this discussion. He has retired
and moved to Canyon Lake. In the photo section are some pictures of his
shop which he has spent the last year assembling.
In addition, we voted to accept remote members. Further development
of these ideas will be required to develop a comprehensive policy to address
this issue. In order that we stay with our plan to separate the business
meeting from the "Chips" meeting we will continue to discuss this in the
business meeting. The business meeting is open to all members. I want to
thank the committee members for their work. The complete report is available
to anyone who wants a copy.
Finally, next month this column will be written by someone else. Myself
and the other officers appreciate the help and support of each of you during
the past year. I feel like we have accomplished some positive things which
will allow our club to continue to grow. Thanks to everyone for your help.
May
Business Meeting Agenda
1. Treasury Balance
2. Discussion of the remote members
3. Domain name registration for the website
April Meeting Minutes
By: Dean Eicher
Chips Meeting - 1:00 P.M. May 20, 2000, Collier Library
Attendance - 30, Three first time attendees
In the Chips Meeting, the following activities took place.
1. Remote Membership Committee Report - JD Wise presented an abbreviated
version of the Report of the Committee on Remote Membership. A motion to
accept out of town members was debated, seconded and passed. No subscriptions
to the newsletter will be offered.
2. Jan Rowland - brought a low cost lathe toolpost grinder he made
from little more than a motor, chuck, and a switch. Jan also showed a machine
he dubbed a 'keyboard jiggle machine', which drills and routs elongated
holes in the workpiece.
3. Doug Blodgett - offered 1/2 horsepower DC motors and speed controls
for sale. He showed us a PM Research miniature lathe casting set. Doug
also had pictures from the most recent NAMES convention, and the Midlands
exhibition held in England last year.
4. John Korman - suggested the club purchase the NAMES videotape.
5. Taylor Brown - brought tools he made for working with molten glass
and several decorative glass beads and tubes he made.
6. Joe Williams - brought metal ingot pieces from the club's first
foundry pour. He also brought information on machine tool way rebuilding.
7. Joe Scott - brought a micrometer lathe carriage stop he made from
a micrometer.
8. Keith Mitchell - brought the tool that was cast at the foundry pour.
9. Tom Moore - brought lathe turret tooling, two geometric die heads,
chasers for the die heads, a point tool, a roller tool, and a spot facing
tool. .
Foundry Group Notes
By Keith Mitchell
At the last foundry meeting we discussed the pour made in April. I had
the tool I had used as a pattern and the copy we had made. Joe Williams
had collected two ingots we had poured from scrap. One ingot was poured
without a degassing procedure and one was fluxed just prior to pouring.
The ingots had been slabbed and machined to look for gas pcokets trapped
in the metal. The unfluxed ingot demonstrated some porosity. Although not
detrimental in the ingot stage it would be undesirable in a finished casting.
Photos from May Meeting
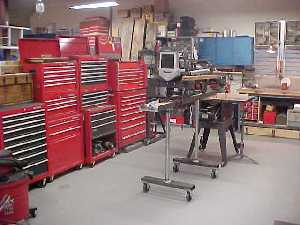
Bill Laird's Shop
|
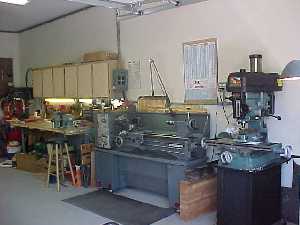
Bill Laird's Shop
|
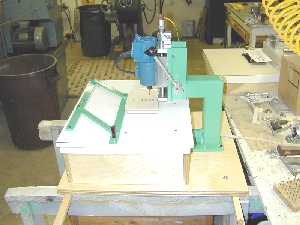
"Jiggle" Machine built by Jan Rowland to route slots in Organ Keys
|
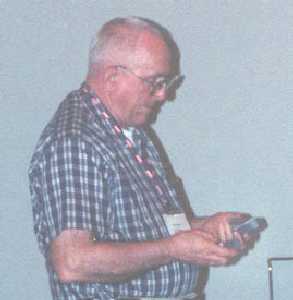
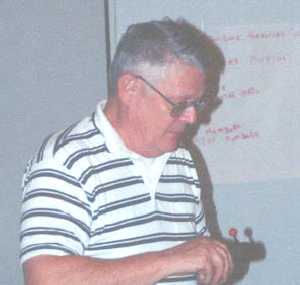
Joe Scott with his Micrometer Lathe stop
|
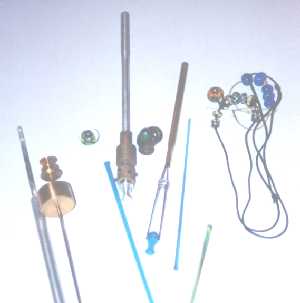
Glass working tools and glass tubing and beads produced by Taylor Brown
|
Joe Williams with machined sections demonstration the benefit of degassing
flux for aluminum castings
|
Tom Moore with geometric die head
|
|
Phosphate Coating of Steel
By Joseph Scott
This is a brief summary of phosphate coating of iron and steel for rust
and corrosion protection. Iron or steel is a mixture of iron, carbon and
other metals. The iron molecules will react with oxygen and form what we
know as rust. Several ways are used to prevent oxygen from reaching the
iron atoms, such as paint , oil or grease. Blued steel is still able to
rust, it is only a color treatment. During the 1920's, someone found out
that if you reacted the iron surface with a phosphoric acid type material,
the resultant iron phosphate would not rust, since it already had completed
a reaction. This treatment also gave a slightly rough surface which absorbed
oil or grease and gave a durable finish. The U.S. military adopted this
finish in the 20's and continues to use it for steel items. The company
which first marketed it is Parker Rust Proofing and the treatment became
know as "parkerizing" . This is a registered trade name for one company.
The generic name is phosphating.
It is an easy process to do as it only involves degreasing, surface
preparation if desired, boiling in the phosphate solution, washing and
then oiling or greasing. Many items are given a sand blast finish to clean
and prep the metal. This gives the slightly frosted look common to many
items, but it is not necessary. The phophated surface looks like rock salt
under a microscope and this is what holds the oil so that that you can
not remove it with ordinary means. It process does change the surface and
dimension by a very small degree.
There are three types of phosphate coating. Iron phosphate, zinc phosphate
and manganese phosphate. Iron phosphate is mostly used as treatment before
painting. Zinc phosphate gives a gray color and the manganese gives black.
Final color depends on the steel, temperature and what you used as a oil
or grease. The coatings are very durable and will not blister, flake or
peel as they are part of the iron on the surface.
There is a local manufacturer in Houston, Aerocote Corporation, but
their minimun sale is 5 gals of concentrate. To use, the concentrate is
diluted with water to 12% and the cleaned metal is immersed in the solution
heated to 200 oF for about 15 minutes. After metal has turned color, longer
times will not give a thicker coating. The solution should be used in a
steel or stainless steel container. Copper or aluminum is not suitable.
I have used coffee cans and/or cake pans for small items. After removing
from the solution, wash it carefully, dry and oil it. I like to use various
greases or waxes to give different colors. The solution is reusable until
it no longer gives a reaction. Usually a crud forms, but this does not
affect the reaction. It can be filtered out if desired. It is not possible
to filter out the phosphate material.
I started using phosphate coatings for military parts which I make but
now use it on anything blued or polished which I don't want to rust. Typical
are such tools as squares, chucks, jigs, etc. I will try to bring samples
to the next meeting.
A caution, this is an acidic solution heated to 200 F. Be careful, wear
protective gear and eye protection. When disposing of the solution, neutralize
it with baking soda first. Material data safety sheets should be obtained
and read first.
Bandsaw Blade Recoiling
By: Keith Mitchell
Bandsaw blades come in a neat easy to store three coil configuration
which when uncoiled fold out into a continous blade. The uncoiling motion
can be somewhat violent particularly with thicker blades so frequently
the survival instinct takes over and there is little opportunity to understand
the manipulations required to get a blade into the three coil configuration.
I've struggled with that on several occasions and have sometimes been
successful and sometimes given up before I was able to recoil the blade.
I don't do it often enough to be able to remember all of the steps. I've
not discovered anything in print on this subject so the last time I was
successful I decided to write it down.
Grip the blade on opposite sides with one hand at 9 o'clock and one
at 3 o'clock and the teeth facing away from you. I wear gloves to save
the wear and tear on my hands. Roll each hand 90 degrees in the horizontal
plane so the blade teeth at your hands are facing away from each other
and away from the center of the loop. You now have approximately equal
loops at 12 o'clock and 6 o'clock. Thread the upper loop thru the lower
loop. Continue to thread and you will find the blade will take on the three
coil storage shape. With 3/4" wide blades I find it's necessary to use
two vice grips to be able to twist the blades to initiate the process.
I'm sure there are other ways of accomplishing the same thing. This
happens to be my way.
