Volume 7, No 6 - June, 2002
|
|
Volume 7, No 6 - June, 2002 |
|
|
|
|
|
|
President - |
Vice President - |
||
|
Treasurer - |
Secretary - |
Ed Gladkowski |
|
|
Webmaster - |
Editors - |
||
|
Founder - |
Membership Information
Membership is open to all those interested in machining metal and tinkering with machines. The purpose of the club is to provide a forum for the exchanging of ideas and information. This includes, to a large degree, education in the art of machine tools and practices. There is a severe shortage of written information that a beginning hobbyist can understand and use. This makes an organization such as this even more important.
Elections
Nominations and elections for all HMSC officers will take place at the June 8 regular meeting. Nominating yourself is OK
Newsletter Index
John Korman and Dick Kostelnicek have finished indexing all articles in the past HMSC newsletters. There is a link to the index on both the HOME and NEWSLETTER pages http://www.homemetalshopclub.org/news/article_index.htm
Business Meeting
Minutes are sent via email or regular mail to club members.
Regular Meeting
1:00 p.m., May 11, 2002 at Collier Library, 6200 Pinemont, Houston, Texas, President Dennis Cranston presiding.
There were 30 attendees, including guest speaker Steven West and one visitor
Presentation
|
|
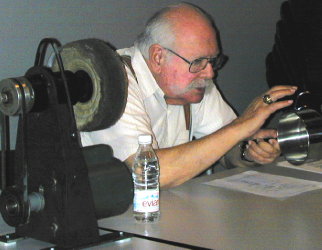
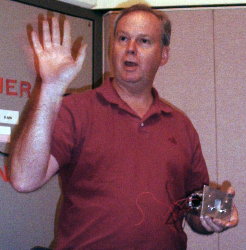
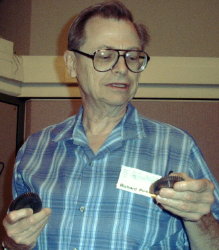
Steven West of New Jersey was introduced by his son, club
member Charles
West  . Steven gave a very lively and informative talk on buffing
and polishing metal, a field in which he holds several patents.
He is responsible for giving Farber Ware pots their outer
luster and an interior satin scratch finish.
. Steven gave a very lively and informative talk on buffing
and polishing metal, a field in which he holds several patents.
He is responsible for giving Farber Ware pots their outer
luster and an interior satin scratch finish.
Show and Tell
|
|
|
|
|
|
|
|
Computer Numerical Control Group
The CNC special interest group convened after the regular meeting. They looked at demo versions of two controller programs; TurboCNC and Master5. TurboCNC is a DOS based program, costing $20. The Master5 is a Windows based system that costs $100. Both can handle 4 axis running basic G and M code. At the next CNC session they will look at examples of motor drives. - Dennis Cranston
Featured Article
by Dick Kostelnicek - HMSC Member
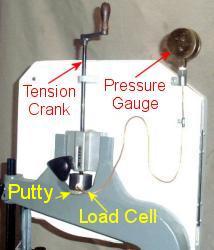 I've
installed a hydraulic load cell and Bordon tube pressure gauge to indicate the
blade tension on my 14 in.Wilton vertical bandsaw. Most of the 14 in. saws
produced today are virtually identical to the original Delta design including
the blade tightening mechanism. On my saw, the spring pointer
that indicates the blade tension is visually inadequate and indicates higher
blade tension than is actually applied. Additionally, I installed a support bracket
for the now extended
tension adjusting screw rod and added a crank handle
for the comfort of my tired old
hands.
I've
installed a hydraulic load cell and Bordon tube pressure gauge to indicate the
blade tension on my 14 in.Wilton vertical bandsaw. Most of the 14 in. saws
produced today are virtually identical to the original Delta design including
the blade tightening mechanism. On my saw, the spring pointer
that indicates the blade tension is visually inadequate and indicates higher
blade tension than is actually applied. Additionally, I installed a support bracket
for the now extended
tension adjusting screw rod and added a crank handle
for the comfort of my tired old
hands.
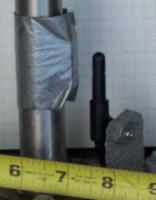
The load cell sits between the lower end of the screw rod and the crotch in the upper wheel support casting. Epoxy putty fills the void between the cell's flat bottom and the concaved depression in the casting. The screw rod has a pointed tip that sits in a matching countersink hole in the load cell piston. The only critical dimension is the cell's bore. I choose 1.596 in. diameter which yields a 2 square in. piston area. Hence, the pressure gauge reads the blade tension directly in pounds. Note: The hydraulic pressure exerted by the load cell must support the tension in both the cutting and return blade segments.
 The
piston O-ring is 1/8 in. thick and 1.625 in.outer diameter.
It is slightly over-size but still fits the specified cylinder bore. I choose
a 300 psi gauge since the highest blade tension for my saw is just under
300 lb. The gauge and load cell are connected with 1/8 in. OD copper tubing which is
silver soldered to both threaded pipe connections.
The
piston O-ring is 1/8 in. thick and 1.625 in.outer diameter.
It is slightly over-size but still fits the specified cylinder bore. I choose
a 300 psi gauge since the highest blade tension for my saw is just under
300 lb. The gauge and load cell are connected with 1/8 in. OD copper tubing which is
silver soldered to both threaded pipe connections.
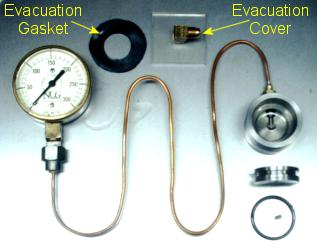
The load cell and gauge are first evacuated and then back filled with oil. With the tubing attached to both the gauge and cylinder body, the cylinder is topped-off with oil. I used vacuum pump oil because it will outgas very little. A clear Plexiglas evacuation cover, fitted with a 1/4 in. male SAE flare connector, is placed over the cylinder with a sandwiched rubber evacuation gasket fashioned from an old tire inner tube. A vacuum is pulled until bubbles entering the cylinder disappear from the tubing connection. The vacuum is then released allowing the excess oil in the cylinder to flood back into the gauge's internal Bordon tube. Oil is then added to refill the cylinder. Next, the piston, with fitted O-ring, is pressed into the cylinder. The piston has an inverted conical dome and a through bleed hole in its center. The piston is depressed until oil gushes from the bleed hole and its top is flush with that of the cylinder rim. A 6-32 set screw, covered with Teflon tape, is screwed into the bleed hole. The load cell is then oil filled, devoid of air, sealed, and ready to install on the bandsaw.
.
|
Carbon Steel |
If you use carbon steel blades, the recommended blade tension is 15,000 psi. I use 0.25 in. thick blades which vary from 1/8 in. - 3/4 in. width. For bimetal and carbide tipped blades, the tension should be 25,000 psi or 66% larger than that shown in the accompanying table. |
|
|
1/8 in. |
47 lb. |
|
|
|
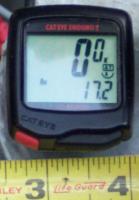
Tachometer from by Geroge Marsden - HMSC Member |
|
 In kilometer setup, it measures up to
1050 rpm, while in mile setup to 650 rpm. The unit does not function below
15 rpm. A small rounding error of less than 0.2% is induced when entering
the pseudo bike rollout (wheel circumference in cm).
In kilometer setup, it measures up to
1050 rpm, while in mile setup to 650 rpm. The unit does not function below
15 rpm. A small rounding error of less than 0.2% is induced when entering
the pseudo bike rollout (wheel circumference in cm).
The display shows up to three digits. A reading of 25.4 indicates 254 rpm. For counting shaft turns, it is necessary to multiply the trip or total odometer reading by 600.
In kilometer mode, set the wheel rollout to 167 (cm/pulse). For mileage mode, use 268. While a small bike spoke magnet comes with the unit, I used a flat ceramic magnet and duct-taped it to the shaft. The ceramic magnet is more powerful allowing greater clearance with the sensor element.
The photo of the Cat-Eye unit shows instantaneous rpm at zero, with average
rpm for the run of 172. The math and reasoning involved in determining the rollout values can
be supplied upon request.
|
The next meeting will be held on Saturday June 8, 2002 at the Collier Library 6200 Pinemont, Houston, TX at 1:00 p.m. Bring along a work in progress to show. Visit Our Web Site |
 |
Right click below then select [Save
Target As...]
Microsoft
Word version of this newsletter 300 KB