
Volume 7, No 5 - May, 2002
 |
 Volume 7, No 5 - May, 2002 |
|
|
|
|
|
|
President - |
Vice President - |
||
|
Treasurer - |
Secretary - |
Ed Gladkowski |
|
|
Webmaster - |
Editors - |
||
|
Founder - |
Membership Information
Membership is open to all those interested in machining metal and tinkering with machines. The purpose of the club is to provide a forum for the exchanging of ideas and information. This includes, to a large degree, education in the art of machine tools and practices. There is a severe shortage of written information that a beginning hobbyist can understand and use. This makes an organization such as this even more important.
Business Meeting
Minutes are sent via email or regular mail to club members.
Regular Meeting
1:00 p.m., April 13, 2002 at Collier Library, 6200 Pinemont, Houston, Texas, President Dennis Cranston presiding. There were 43 attendees, including 5 visitors. The visitors included Scott Coleman, Ed Lewis, Vinnie Rockburn, and Don Rutherford.
 New rules for the Home Metal Shop Club library are as
follows: no books, tapes, or other
materials will be loaned or distributed by mail. These items must be picked up in person only, and with a prior
notification of the librarian.
All material will be signed
by the person borrowing the material.
Maximum loan is 5 items, which may be of a single item or in combination
(i.e.: books, tapes, other) at any one
time per person. There will be a one
month time limit on borrowed materials.
Items are to be returned at the following meeting, or if unable to
attend in person, can be mailed back to the librarian at the borrower’s
expense, to meet the one monthtime limit.
Presentation
No presentation at the April meeting.
At the May meeting Steven West will present "IN THE BUFF" or "BUFFING EXPOSED" - Slightly less than everything you wanted to know about buffing and are still afraid to ask
Show and Tell
|
|
Joe Scott showed a flat bottom drill, a coned guide bushing for a lathe turret, and a gun part die. |
Richard Pilcher showed a lathe chuck adapter bushing and home laminated drawings using contact paper. |
Bill Kimbrough showed some bodacious buttons he made out of titanium to solve the laundry-lost button syndrome. Now if he can only fix the lost sock problem. |
|
Dick Kostelnicek showed a very nicely designed and built home-made sand muller. |
Tom Moore showed a steady rest for his Myford lathe, built from a casting kit. |
Ed Gladkowski showed a tool holder for turning matching internal and external tapers without changing the compound rest. |
|
Featured Articles
|
|
|
|
|
Making Thin Shim-Ring Washers by Jan Rowland |
|
Suppose that you need a 0.0015" thick shim-ring washer to place behind an ABEC-7 bearing preventing it from going all the way home. You have an assortment of shim-stock, but how do you create a 41/64 in. hole in a patch of that stock, and then cut a 1-1/16" dia. ring concentric to that? Well, its easy!
I've done it by employing backer boards made from MDF (medium density fiberboard) and Baltic birch plywood scraps drill bit that is properly sharpened. For very thin shims, use aluminum plate scraps in place of wood. The above photos chronicle the process of creation of a 0.0015" shim-ring washer using MDF.
Starting with the top-left photo, I've placed a scrap of MDF under the shim-stock patch. I use Wallsaver Double-Stick Scotch Tape to hold the shim to the backer board. Next, I used another scrap of MDF to tightly encased the shim. A hole is then drilled through the MDF-shim-MDF sandwich. The exposed shim is shown at the upper-right, Carefully peel the shim off the double-stick tape so it isn't ruined. Soaking in a solvent may be necessary for very thin shims.
Next, I've used a ˝-13 stud and two nuts (borrowed from my milling-machine's clamp-set) as an arbor to hold the wood surrounding the thin drilled shim. A portion of the left piece of wood was first turned down to the washer hole size in order to center the drilled shim, The right piece of wood is partially drilled out to the size of the shim's hole. The resulting two wood pieces of wood tightly contain and centers the washer on the arbor, The entire length of wood is turned to the final washer diameter.
Finally, the 0.0015" shim-ring is shown posed next to an inch-ruler. Drilling a shim this thin, with large
twist-drill, and backed by MDF leaves its edges a bit raged. Had I used aluminum scraps
instead, the resulting shim-ring washer would have been quite nice.
Making Shim Washers with Wood's Metal's Help
by J. R. Williams - HMSC Member
Many moons ago an engineer wanted a special thin orifice made from stainless
steel shim stock. The material was around 0.005 inch thick. A punched out part
was not satisfactory. The shop machinist tried the clamping procedure and did
not arrive at a good part. I secured a small metal can, and with some low
temp alloy, Wood's metal, I cast the raw stock in the metal. Then the combination
was machined on the OD and ID. The low temp alloy was then removed from the
part. It worked!. No way would we tell the engineer how the part
was made.
by Dick Kostelnicek - HMSC Member
|
|
|
|
|
|
|
I crafted a replacement for a very small pinion gear used in the raising mechanism of a digital readout height gauge. The 20-tooth gear was about 1/4 in. outer diameter. Specifically, it was a metric M-0.3 which corresponds to 84.6 diametral pitch. A metric gear is defined by module or M-number, being the ratio of the gear's pitch diameter in mm. to the number of teeth. In the U.S., we classify gears by diametral pitch, the ratio of the number of teeth to the pitch diameter. Pitch diameter is the effective or rotational diameter and lies approximately midway between the root and crest of the gear's teeth. The product of M-number and diametral pitch is 25.4. I made a single-point fly-cutter to cut the gear teeth on a column and knee type mill, quite a large machine for making such a small part. A 360-position 5-C collet fixture, using 18 degree increments, was employed to index the gear.
Fig. 1 shows the damaged pinion. Fortunately, there were unbroken teeth diametrically opposite one another. This allowed me to gauge the pinion's outer diameter in order to size the new gear blank. Fig. 2 shows the fly-cutter's construction. The cutter bit was ground under a magnifying glass from a 3/16 in. dia. HSS boring bar cutter blank. Fig, 3 shows the cutter's close contour fit between two adjacent unbroken teeth. Setting the cutter on the gear's center was accomplished by chucking a scriber point as seen in Fig. 4. The mill's horizontal feed was used to cut each tooth to the desired length as seen in Fig. 5. The depth of cut was determined by measuring both the outer and root diameter of the broken gear under a magnifying glass with an outside caliper. The finished replacement pinion is shown in Fig.6.
For further information, see the article in the Nov.
96 HMSC newsletter on gear cutting and dividing heads.
by. J. R. Williams - HMSC Member
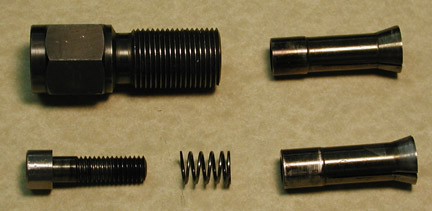 fabricated a bullet puller that
has been used considerably over the years. The body is a section of one
inch hex steel with standard reloading press threads of 7/8-14. The overall
length is 2.7 inches. The collets are made from O-1 tool steel and have been
hardened and tempered. The base OD is 0.558 inch and the taper is 15 degrees
with the large diameter 0.710 inch. They have been slit in three places with
a 0.035 inch thick slitting saw. The overall length is approximately 1.9
inches. There are two sixes in my collection, 7 mm. and .30 cal. The
screw is a standard 3/8-16 socket head cut down for the length required. The
spring is 0.473 OD x 0.700 inch long with 0.048 inch diameter wire. I
was able to purchase old ammunition, at a reasonable price, with corrosive
primers and used the rig to pull the bullets apart so I could dump the powder and
knock out the old primers. New primers were installed and the powder
and bullet were replaced.
Cartridge Case Length Trimmer and Gage
by. J. R. Williams - HMSC Member
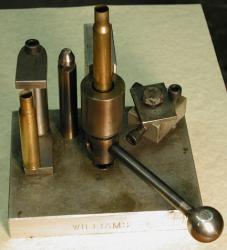 If you do a lot of shooting, you'll soon be reloading spent cartridge
cases. With each shot, the case expands both in diameter and length.
After a couple of times, it requires cutting the neck length
down to specified length. My device was designed to be used in a drill
press with a positive stop for the drill press's spindle. The drill press spindle stop assembly, bolted to the base for
storage with a
cap screw and washer, is at the right side of the photo. The
main cartridge case holder was designed to use commercial collets. The
trimming cutter was made from O-1 tool steel and has a removable pilot so it
can be used with different caliber's. In operation the case is set
in the collet, the handle rotated to the right about 180 deg to tighten the
collet, and then the drill press spindle is moved down to trim the case length.
A cartridge case length gage is attached to the base on the left side. It was made from a section of drill rod cut to the specified case length
and mounted between two sections of ground flat stock. The
unit has a center hole threaded so it can be bolted easily to the drill press
table. I have no idea how many cases it has trimmed but I have
two rifles with a recorded total of about 16,000 rounds.
by Keith Mitchell - HMSC Member
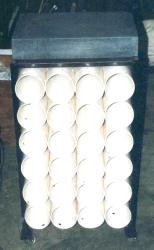 I always seem to end up with 6 in. of 1/2 in. round bar, 12 in. of
allthread, etc. at the end of every project. For a long time I just threw these
pieces into a bucket. I was kind of like the old maid who had a ball of string
labeled: Pieces of string, too short to use but too long to throw away.
But, from time to time, we all rummage through that bucket looking for just
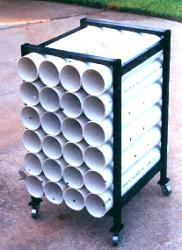
the right size piece for the task at hand. I made this rack to store those pieces.
The tubes are 4 in. thin wall sewer pipe. The frame is 3/4 in. x 1-1/2
in. x .065 in. wall tubing. The rack has metal rather than rubber
casters in order to prevent a flat spot from developing due to the excessive
weigh. The rack is designed to roll under my bench. As a bonus, I was able to
store my surface plate on its top.
|
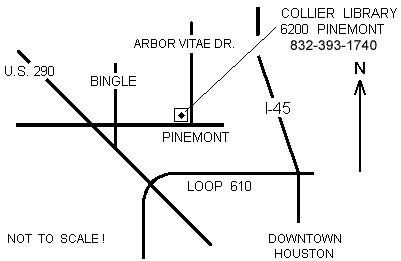
The next meeting will be held on Saturday May 11, 2002 at the Collier Library 6200 Pinemont, Houston, TX at 1:00 p.m. Bring along a work in progress to show. Visit Our Web Site |
 |
Right click below then select [Save
Target As...]
Microsoft
Word version of this newsletter 305 KB
