I'm sorry, it's all my fault. Here it is mid-May and I'm just getting started on the newsletter. It's been one of those months. The last meeting was on the 19 of April. Our attendance is still doing pretty well, there were 23 at the April meeting. John tells me our membership is currently up to 38 members. Watch out AARP! In this issue two members are helping out with articles and material. This is really helpful, they deserve some recognition. George Edwards has a piece about the trip to NAMES. And Gordon Lawson shows us a way to build a "Poor Man's" foundry. Next month we'll have several neat hint that John Korman has contributed. Thanks guys, for helping out.
Membership is open to all those interested in machining metal and tinkering with machines. We currently have members that have considerable backgrounds in the hobby, and other members that are just starting. The purpose of the club is to provide a forum for the exchanging of ideas and information. This includes, to a large degree, education in the art of machine tools and practices. There is a severe shortage of written information that a beginning hobbyist can use. This makes an organization such as this even more important. For membership information and forms, call John Korman at (713) 723-8597.
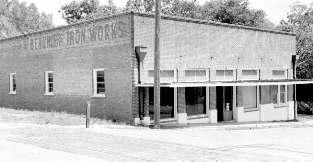
It was a great day to get out into the country. About twelve of us, including a few wives, met at a restaurant in Brenham before going over to the site. Carol met us at the site and invited us in to see a piece the Eyes of Texas had done on the Iron Works a few years back. We then spent most of the rest of the afternoon exploring the old Iron Works and trying to imagine what could be done with all that ancient equipment.
The picture above is of the front brick section of the business. Behind it is a large metal building full of old machine tools all driven by over-head line shafts. It was rather dark inside so I had a hard time getting a good shot. I hope to get the time to return later to do a better job documenting the site. I imagine there were eight or more lathes, most built about 1920 to 1925. There was a small shaper, about 16", a small horizontal mill, a very large wood working jointer, and a few other machines that appeared to be special purpose. Toward the back of the building was a forge and trip-hammer. The trip-hammer was actually located outside under a shed roof. It was half buried in casting sand, as was most of the rear of the building. The foundry was located in the back of the building. There was a cupola just outside the rear wall. It was about ten feet in diameter and about thirty-five feet to the top of the stack. The spout stuck through the rear wall where the molten cast iron could be drawn and poured into molds.
I could have spent a week digging around through that place, we definitely need to go back soon.
I recently had the pleasure of attending (for the second time) a model engineering show in Wyandotte, Michigan...a suburb of Detroit. This was the 8th annual NAMES Exhibition and was held (as has become the practice) on the last weekend in April, in the Yack Arena.
Travis Jaroszewski and I had planned to leave Houston early Friday morning and when we arrived at the terminal gate we met up with Don Foster and his grandson and several folks from the Houston Area Live Steamers (HALS). Keith Mitchell had planned to meet us at the Crowne Plaza Hotel near the Detroit airport, but we received a fax from him later that evening saying that he actually had to choose between pursuing his hobby and work.....and work won out!
We arrived at Yack Arena about 8am and even though the show didn't open until 9am, the good folks let us sign in and start our visit through what has to be one of the best exhibits and collections of metalworking as we know it. We paid a one-time fee of $5.00 for both days and received a well done Exhibition Brochure and a souvenir button (which was also our ID for leaving and returning to the show).
Imagine walking into a circa 1950 gymnasium which also doubled as a hockey arena and you can picture the Yack Arena. The bleachers were folded up and pushed back behind curtains along the walls. There was a snack bar, several meeting rooms and restrooms. Anticipating a large attendance (which there was) the organizers also had a shuttle bus running back and forth to a nearby high school parking lot. All things considered, this was a well planned show and indicated a lot of work on the part of the organizers.
The main entrance to the show brought you into the middle of the arena. Several aisles ran from one end of the building to the other...."goal to goal". There were 5 rows of vendors taking up about two-thirds of the front part and the exhibitors were in the back third of the arena. The vendors represented several aspects of our hobby. There were several tool and/or equipment dealers with hard to find parts and special tooling items. I particularly enjoyed looking through the tables of used "goodies" and trying to figure out how I could get them back on the airplane without exceeding the weight limit. There were folks specializing in books and publications and a few selling hardware and construction materials. The majority of the vendors were displaying their various casting kits and/or construction plans. I was surprised and delighted to see that many of them had added to their offerings since I had visited the 6th annual show 2 years earlier.
Since one of my favorite parts of the show is looking at the various casting kits and dreaming about owning and building them....or a least owning them just in case I ever get "caught up" enough to actually build them....and realizing that this may be the last time to buy them since they may "never be cast again"....etc., I will spend some time covering the various offerings.
The casting kits and/or construction plans fell into the following groups. Folks supplying those interested in building stationery engines by far represented the largest group. There were three primary types available....steam, hot air and internal combustion. You had the choice of working from castings on some models and there were others that required only bar stock, etc. The hot air and/or Sterling engines were available in those falling into the "historic" categories as well as the more modern types. Internal combustion kits and/or plans were available for various categories from single cylinder oil field types to V8 automotive engines to 18 cylinder aircraft engines....all of which were working models!
In addition to casting kits for engines, you could also see and buy kits for making various shop tooling and lathe accessories and attachments. I was particularly interested in a casting set for making a precision filer and put it on my "list" of things that I "really need".
We spent the morning looking at the vendor part of the show and then we were ready for a break and lunch. There is a snack bar/lunch room in the arena if you don't want to go outside and there are several very nice sports bar type eating-places immediately across the street.
After lunch, we started our tour of the exhibits. This is the part of the show where I learn how far I have to go and how much I have to learn. If you have never been to a show like this, it is hard to imagine the seemingly endless display of home shop expertise at its highest level. The machining and the finish work was superb and the each of the exhibitors was more than willing to share any information they could as to where they got the materials as well as techniques used in machining and finishing their models. If you are looking for casting kits and see one on an exhibitor's table that you don't have a source for....ask them where they got theirs. Often, you will get the name of another resource that is not advertised or you will find out that the exhibitor cast the parts themselves and just happen to have a "few" more sets at home that they are willing to part with. One difference at this show is that the exhibitors are able to demonstrate the actual operation of their engines. Compressed air is supplied to the tables to demonstrate steam models and the hot air engines are "fired up" along with the internal combustion models.
There were several seminars presented throughout the day covering the following topics: Electrical Discharge Machining (EDM); Metalworking on the Internet; Hot Air Engines; and Building a scale model of the Ford Model T. These seminars were an hour each and well attended.
Finally, it was a real pleasure meeting with and talking to folks I've met on the phone over the years as well as those I've swapped articles with on the Metalworking Newsgroup on the Internet. It's really nice to be able to put a face with a voice and/or an article or advertisement.
In closing, I highly recommend that you consider attending one of these shows. They continue to get better and bigger each year without losing the primary focus. Their success is evident in the recent additions of similar activities around the world. Some of the newer shows are specific to hot air, etc. and some or oriented to larger outside exhibits including full size rebuilt equipment as well as scale models. The Pacific Rim - International Model Engineering Exhibition is scheduled for September 19, 20 and 21 in Eugene Oregon. This is the first annual show and many folks at the NAMES show were talking about attending and/or participating. Hope to see you there!
I've heard from several people that they'd like to try doing foundry work, but are afraid that if they don't like it, they've spent a lot of time and money on something they hate. I think we've all done something like this and know exactly what they're talking about. How would you like to try doing this in your own back yard in only an hour and a half and less than ten bucks total cost? I thought that might get your attention...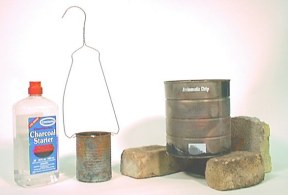
You need:
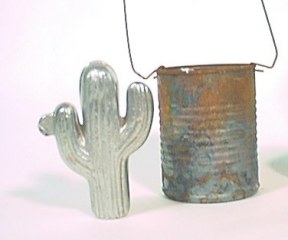
With the hammer and nail, punch a bunch of holes in the bottom of the coffee can (I counted sixty-six in the test model). Also punch two holes opposite each other near the rim of the Wolf Brand Chili can. Cut one coat hanger in two on the bottom edge. Thread each end through the holes in the rim (of the chili can) and crimp to ensure it doesn't fall out. Stretch the hanger upwards. Bend the can slightly to form a pouring lip. Stretch and twist the other hanger into a long double wire rod.
With the hammer, crush the aluminum cans down into a small space. Dry fit them in the chili can to make sure they fit without binding. Stuff as many cans into the chili can as you can. Don't sweat it if they all won't fit.
Put the bricks in a V or U shape with the coffee can on top. Only the edge of the coffee can is supported by the bricks (this leaves the holes in the bottom of the can exposed). Make sure there's only one pening. Place the shop vac hose or the hair dryer nozzle about two to three inches away from this opening.
Turn it on and check for air out of the top of the coffee can. If the amount of air seems a lot less than the vac (or dryer) is putting out, place a piece of sheet metal under the coffee can at a forty five degree angle to help the air to reach the holes. Fill the coffee can about half full with charcoal. Test fit the chili can to ensure a relatively flat surface on top of these briquets.
We're about ready to light up, so let's talk safety for a moment. Charcoal lighting fluid is very flammable. Soak the charcoal well, then put the fluid away. Don't attempt to add more fluid once the fire is lit. We're dealing with high heat, much hotter than most people have dealt with. Be very careful and use your gloves, pliers and coat hanger rod to do things "long distance". Once the fire is going, the outside of the coffee can will discolor from the heat. Don't take deep breaths around the can! Not only is the paint burning off, you've also got vaporized tin plating and carbon monoxide to contend with. Doing this in the back yard should keep you safe as far as fresh air is concerned. If you thought to do this in the garage on a rainy Sunday afternoon, forget it!
Soak the charcoal in lighter fluid and put the fluid away. Light the fire like you would any charcoal fire (a lit piece of paper keeps it "long distance"). Once the fire is going good (about ten-fifteen minutes Hint: the flames are no longer present, but there is definitely heat), put the chili can on the coals. Place more charcoal around the can. Step back and start the air blast (from the shop vac or hair dryer). Don't put your face or any body part above the top of the coffee can, as it will get very hot.
Observe the chili can closely. You'll see the paint start to burn and turn white on the aluminum cans within. (Note: When paint burns, it does not always have a flame.) Possibly, you'll smell a caramel odor (if they're cola cans) or possibly a brewery (if they're beer cans). Take the rod and poke the cans (not violently, you don't want a coffee can full of coals on your feet). When they easily move about and the ash separates, it's time to add more cans. Repeat this process until you have no more cans (remember, you only have eleven or twelve).
Move the dross (the mucky dark gray or black stuff on top) over to the side opposite the pouring lip you made with the rod. Turn off the air blast (vac or dryer). Grab the coat hanger handle with the pliers (Don't forget your gloves!) and remove the chili can from the coffee can and set it down on the ground. Quickly grasp the side (or rim opposite your pouring lip) of the chili can with the pliers and pour the molten aluminum on your dirt. Don't attempt to handle your pour for a little while (several minutes, at least!). You can start the clean up while waiting for your blob to cool. Dump out the coals and extinguish them with the water. Let the cans cool by themselves. Start putting the other stuff away. By the time you're done with that, you can cool your aluminum blob with the water.
Now, admire your work! You've now got the experience, did you enjoy it? If so, get Dave Gingery's book on the home foundry and get crackin'. It's recommended that you not reuse your mini foundry... It's not built for the high heat and stress that a crucible full of aluminum would put upon it. Best of luck, future sand crab.
Lindsey Publications, Inc., P.O.Box 538, Bradley, IL 60915-0538 sells Gingery's book. Ask for No. 163, Charcoal Foundry by Dave Gingery $7.95.
A home shop foundry has different requirements from a commercial foundry. For instance, a home shop usually will not have to pass an OSHA inspection.
This is no excuse, however, to not follow some simple guidelines. In this regard, I have outlined a list of safety equipment. Each item has proven its worth.
Leather work boots, preferably with steel toes. A friend, who was helping me, almost came to disaster because he accidently stepped on a hot piece of aluminum slag. (In bright sunlight, hot items don't look as hot.) He now has a souvenier tennis shoe which he shows to his friends. On the bottom is a hole the size of a quarter.
Trousers, not shorts and long sleeve shirt or welder's vest. While reducing some salvage lead pipe into convenient sized ingots for future use, I added some wet lead to the molten mixture. Kaboom! is a mild word for what happened next. Fortunately, it was 785 degree lead and not 1150 degree aluminum. I "only" suffered minor burns on my legs, arms and neck.
Welder's gloves or other leather gloves with long gauntlets up the arm. I couldn't begin to recount the number of times I have parboiled my hand because "I just need to do this little thing and my gloves are over on the table and inconvenient..." The foundry is hot! Aluminum is mild compared to brass or iron, but it is still about three times hotter than the flash point of paper.
Long-handled pliers (or tongs) and three foot 1/4" rod. The pliers are for adding things to the crucible and adjusting coals, etc. The rod is used to mix the crucible's contents and move dross to the side just before pouring.
The above equipment should be adequate for a charcoal foundry. An electric or gas-fired foundry may have different requirements.
