Volume 9, No 10 - October 2004
|
|
Volume 9, No 10 - October 2004 |
|
|
|
|
|
| President - |
Vice President - |
||
| Treasurer - |
Secretary - |
||
| Webmaster |
Editors - |
||
| Founder - |
SIG Coordinators - |
Statement of Purpose
Membership is open to all those interested in machining metal and tinkering with machines. The club provides a forum for the exchanging of ideas and information. This includes, to a large degree, education in the art of machine tools and practices. Our web site endeavors to bring into the public domain written information that the hobbyist can understand and use. This makes an organization such as this even more important.October Presentation
Dennis Cranston - HMSC member will speak on building a homemade
CNC machine.
Regular Meeting
Dues are due for 2004-2005.
$15 / year. Please pay John Hoff - Treasurer.

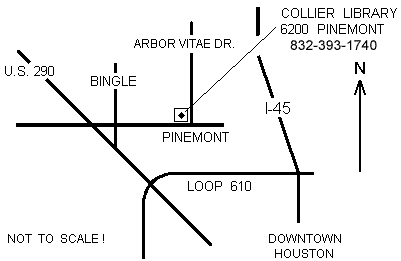
Collier Library, Houston Texas, 1:00 p.m., September
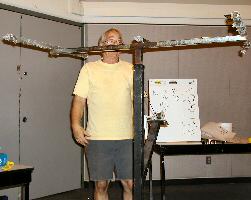
11, 2004, Chuck West, President, presiding. 32 members were present. Bill Morgan brought a bucket of small parts, freebie stuff,
for the members to pick through.
Business Meeting
Minutes are sent via email or regular mail to club members.
Presentation
|
|
Special Interest Groups Activity:
Foundry Group
 The
foundry group discussed low melting point alloys and plaster molds.
The
foundry group discussed low melting point alloys and plaster molds.
Show and Tell
|
|
Dick Kostelnicek showed his taper tooling tailstock holder. He also brought his home made fixture for sharpening horizontal milling cutters on a surface grinder. |
Ed Fuller showed his Turkish Mauser. He used a carbide cutter to modify the receiver bridge for the scope mounts. |
|
Norm Burls showed his home built hand truck/ easel and talked about how he uses it. |
Tony Burnett showed his Sheet Rock lifter and how it worked. It extended to the top of the meeting hall roof, about 16 feet tall. |
Chuck West showed some manuals he obtained on Ebay concerning his Norden bombsight and how to fly a B-17. |
A home built tapping machine was brought by one of the club members. |
Featured Articles
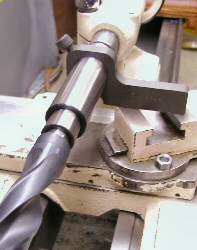
Drilling a Long Bar on A Short-Bed Lathe
by
Ed Gladkowski - HMSC Member
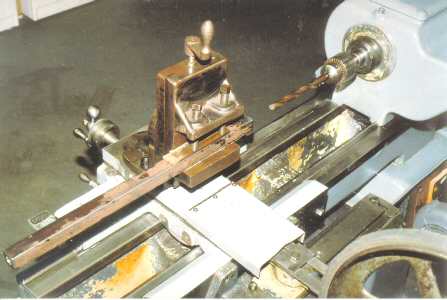 I
needed to drill 9/16-in. diameter holes, 2-in. deep in both ends of a length
of bar stock. The bench drill press would not handle it, and the across-corners
dimension of the square bar was too big to fit through the lathe spindle hole.
The bar was longer than the between-center distance of the lathe, so even if
I held one end in the 4-jaw chuck and ran the other end in a spider or cat-head
in the steady rest, there was no room for the tailstock chuck and drill bit.
I
needed to drill 9/16-in. diameter holes, 2-in. deep in both ends of a length
of bar stock. The bench drill press would not handle it, and the across-corners
dimension of the square bar was too big to fit through the lathe spindle hole.
The bar was longer than the between-center distance of the lathe, so even if
I held one end in the 4-jaw chuck and ran the other end in a spider or cat-head
in the steady rest, there was no room for the tailstock chuck and drill bit.
Remembering an old milling attachment, the lathe tailstock was removed and the bar stock set up and drilled, as shown in the picture. With this method, the only limit on the stock length became the width of my shop, though a roller support would be helpful to support the outboard end of really long stock.
A quick way of centering square stock in a job like this is to first put a piece of round material, of the same diameter as the across-the-flats dimension of the square stock, in the vise. Indicate this true (on center) with a dial indicator held in the chuck, and then replace it with the square material. which will be automatically aligned. If the vise's fixed-jaw has a longitudinal V-groove, use a parallel between the fixed-jaw and the work.
A nice bonus for drilling with this method is the available power feed using the lathe carriage feed.
Surface
Grinding (part 1) - Introduction
by Sparky - HMSC
Member
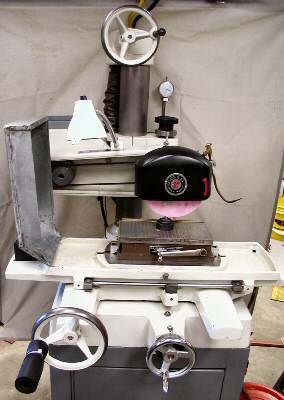
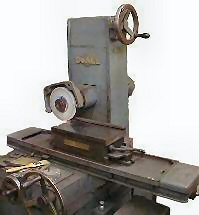 In
the small or home metal shop, the surface grinder is most likely found with
a 6x12-in. manually actuated table. This means that it can surface
a 6 by 12 inch rectangle under hand feed. Although surface grinding can be performed
wet or dry, these small machines are mostly used dry.
In
the small or home metal shop, the surface grinder is most likely found with
a 6x12-in. manually actuated table. This means that it can surface
a 6 by 12 inch rectangle under hand feed. Although surface grinding can be performed
wet or dry, these small machines are mostly used dry.
Wet grinding controls heat buildup in both the work and the wheel. It can also successfully suppress dust. Outside of the production line, liquid coolant is rarely necessary. However, when it is employed, it creates a real mess. Having dirty or spoiled coolant is worse than using none at all. Some of them can be bad for your health and rust your machine. Reducing heat build up can often be accomplished through other means than by using coolant. Good coolant is expensive and difficult to dispose of properly. So, think twice about its use. How much and what kind of grinding are you really going to do? If you use a coolant, be advised that you'll have to clean up afterwards.
Heat can be managed, to an acceptable degree, during dry grinding with proper wheel selection, feeds, and work habits. On the other hand, dust must always be controlled. Grinding dust, called swarf, is pervasive. The light fines can hang in the air for quite a long time. It will cover a surface plate in no time, making cleaning a continuous chore. Precision work will become very difficult. Dust control and collection is just as important to your health as it is to a clean shop. A dust mask will do, but is a poor substitute for clean breathable air. Your lungs and nasal cavity were not meant as a point of entry for iron and the various trace elements found in the work material that can be dispersed around you.
Like most other tool room machines, these small surface grinders spend most of their lives just being handy. They can shape small stamping dies and cutting tools, finish part surfaces after heat treatment, and cut-off HSS ( high speed steel ) blanks. They are also platforms for add-on fixtures that allow these machines to do more complex work. Additional tooling can turn the surface grinder into the one of the most versatile machines in your shop, rivaled only by the lathe. Except for the sine bar and some rotary tools, cheap import tools and fixtures can be considered as blanks to be finished to acceptable accuracy on your machine. On the other hand, having to regrind a brand name, high cost grinding vise right out of the box, will leave you sleeping on your stomach for some time. Inexpensive parallels, V-blocks, and angle blocks are all fair game for finish grinding as long as they are hard enough to resist the anticipated wear. Reworking inexpensive or poorly finished tools can make an excellent home project.
The ability of the grinding wheel to take incredibly thin cuts and still leave an excellent finish, regardless of hardness, makes it the perfect finishing tool. Material removal rates, in cubic inches per minute, are usually not very impressive. On the other hand, conventional machine tools have higher material removal rates but lack the ability to finish work with a high degree of accuracy. Without a surface grinder, machining to better than 0.001 inch or to a low surface finish number (RMS measure of roughness) is often impossible. Furthermore, metal removal with conventional cutting tools can be difficult when the surface has a high degree of hardness or softness. Try milling a piece of soft rubber or turning a hardened HSS bar in a lathe.
Because there is usually just one operator, scheduling maintenance is not much of a problem in the home shop. If the machine's manual is at hand, be sure to read it. It will cover lubricants, lubrication points, and procedures for mechanical maintenance. Pay close attention to shields, wipers and drive components. If something is broke, fix it before running the machine up to speed. Other maintenance includes rust prevention and remediation. The steel used on the top of magnetic chucks is soft and rusts easily. Occasionally, the chuck will need re-surfacing. Grind it in place and on the machine for which it is to be used. Big dings (dents), badly worn spots, and re-mounting of the magnetic chuck will all require its re-surfacing. Small dings and light rust can be taken care of with a flat hand-rubbing stone. Try not to make a bigger mess than you had at the start.
And last, but of utmost importance, safety must be considered before the sparks begin to fly. In the shop, you are responsible for your own and the safety of others. There are few machine guards to protect you from stupidity, ignorance, carelessness, and many accidents. Wheels can fail explosively. Workholding magnets can fail, sometimes leading to wheel failure. Operators can forget to magnetize the chuck, and just because there are no sparks coming from under the wheel, the work can get caught by the wheel and propelled like a bullet from a gun. The cutting forces and the amount of time it takes to grind human flesh are very small. Bumping your knuckle against the side of a running wheel will yield a painful, slow healing, wound. Before mounting a vitrified bond wheel, make sure that you check its soundness by ringing it (covered in a subsequent article). Use blotters to cushion both sides of the wheel. They're not there just to advertise the manufactures name. Finally, don't over-tighten the wheel's adapter nut. When starting a freshly mounted wheel or one that you did not recently mount yourself, stand in front of the machine and out of the line of fire. When you see a wheel come apart, if you haven't already, you'll need no further cautioning.
Next month I'll discuss how to choose the grinding wheel. Until then, Bon
grinding!
Shaper Crank Handle
Storage Post
by J. R. Williams - HMSC Member
 I needed to find an
easy place to park the feed crank handle for my small shaper, so it would be convenient
to find and use. I do not like the idea of leaving it attached and rotating when the machine is under power. So, I replaced one of the machine's base hold down bolts with a longer one that
has a
hex adaptor section and projecting post The hex part was turned from a long 9/16-in. hex extension
nut so that it ended up with a round ˝-in. diameter post to fit into the ˝-in
square internal section
of the crank handle. The hex adaptor
part was drilled thru for 3/8-in. and silver soldered in place. This simple bolt modification solved the
problem and did not require any modification to the machine.
I needed to find an
easy place to park the feed crank handle for my small shaper, so it would be convenient
to find and use. I do not like the idea of leaving it attached and rotating when the machine is under power. So, I replaced one of the machine's base hold down bolts with a longer one that
has a
hex adaptor section and projecting post The hex part was turned from a long 9/16-in. hex extension
nut so that it ended up with a round ˝-in. diameter post to fit into the ˝-in
square internal section
of the crank handle. The hex adaptor
part was drilled thru for 3/8-in. and silver soldered in place. This simple bolt modification solved the
problem and did not require any modification to the machine.
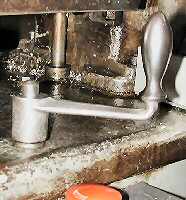
. Taper
Tooling Tailstock Holder
by
Dick Kostelnicek - HMSC Member
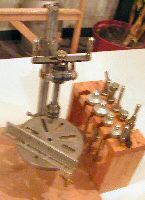
 My
lathe accepts #2 Morse taper tailstock tooling. Drills larger than 3/4-in.
tend to spin in the ram's socket. On most lathes, the ram's socket does not
engage the tang on the end of taper shank tools. Hence, there
is always the danger of slipping and subsequent scoring of the ram's
internal taper. Now, some would say that this is a 'good thing,' and I would
agree, but 'just sometimes.' For example, if you hold a tap or die
in a chuck or fixture supported by the tailstock, you may want the taper to
break free whenever the cutter bottoms out or yields excessive torque.
My
lathe accepts #2 Morse taper tailstock tooling. Drills larger than 3/4-in.
tend to spin in the ram's socket. On most lathes, the ram's socket does not
engage the tang on the end of taper shank tools. Hence, there
is always the danger of slipping and subsequent scoring of the ram's
internal taper. Now, some would say that this is a 'good thing,' and I would
agree, but 'just sometimes.' For example, if you hold a tap or die
in a chuck or fixture supported by the tailstock, you may want the taper to
break free whenever the cutter bottoms out or yields excessive torque.
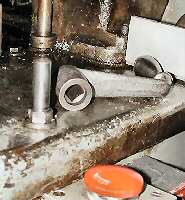
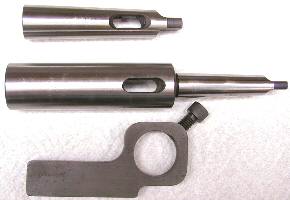
Alternatively, you may prefer that the tool not slip but rather the lathe's motor stalls, or drive belt slips. I prefer this method of providing break-away torque for large diameter tail stock tools. In order to prevent tool rotation, I use a Morse taper extension socket and a home made dog as shown in the left hand photo. The right photo shows the three parts that make up my taper tooling tailstock holder. The extension socket ( center in right photo ) has a #3 female socket and a #2 shank Only once in a great while do I use #3 taper tooling, which will not fit my tailstock without the extension. I usually use a #2-to-#3adapter sleeve ( top of the right photo ), for my #2 tooling, in order to reduces the size of the extension socket. To prevent the extension and sleeve from turning, I built a dog ( bottom of right photo ) that rests on the lathe's compound ( see left photo ). A socket head cap screw engages the socket extension's knock-out hole in order to prevent rotation.
The extension socket
and adapter sleeve are available at any tool supply house. A drawing for the
dog is available from the club on the web by
clicking
here.
|
Visit Our Home Page at |
 |
Right click below then select [Save
Target As...]
From Netscape select [Save Link As..]
Microsoft
Word version of this newsletter 308 KB


 Doug
Chartier made a presentation about the information contained
in Machinery's Handbook and how to use it to solve various shop
problems. The group went through several problems related to milling and
lathe single point cutter feeds and speeds for different work materials,
Doug
Chartier made a presentation about the information contained
in Machinery's Handbook and how to use it to solve various shop
problems. The group went through several problems related to milling and
lathe single point cutter feeds and speeds for different work materials,