Here is the metal working wisdom of our members and contributors. If you have some knowledge you want to pass along to others, send it to the
Webmaster
for inclusion here.
Lathe Leveling:
When you are setting up a lathe, it is not crucial that it be level. It is important, however, that the bed be straight and not twisted. Level is a convenient reference point to do this. Unfortunately, if you have a 6-foot bed and several supporting pads you will have an over-constrained system and you are liable to twist the lathe bed. Some lathes are designed to rest on just three points. However, this doesn't work well on large lathes because three supports can't support the entire load.
The leveling process is going to be irritating no matter how you do it. You can make it easier by starting with a pair of less sensitive carpenter's levels to get close. However, you should first check that the levels actually read level by putting them horizontally against a wall with one end resting on a nail. Rotate the level till the bubble indicates level and draw a line on the wall along the bottom edge. Turn the level end for end, re-level, and re-mark. The result is two diverging lines. Mark a point midway between these lines and align the level resting on the nail to this mark. Finally, without moving the level, adjust the bubble's holder to indicate level.
Now, level the long way by placing each level at opposite ends of the lathe bed so you can look at them without having to move a level. Next place the levels perpendicular to the bed in order to remove both the front to back tilt and the bed twist. Finally, use a sensitive level to get it just right. Remember, only the twist is important at this point.
You can also do some testing either with a test bar or by cutting. First make sure your tailstock is exactly on center. Chuck an indicator in the spindle and sweep the outside of a dead center placed in the tailstock. Adjust the tailstock set over to zero. Now, make a test bar from several feet of drill rod. Drill centers in both ends of the bar by supporting the free end with the steady rest. Place the bar between centers and traverse it with an indicator. Any change in reading indicates that your bed is warped. By cutting and then measuring a test bar you can do a similar test. If your test cut tapers evenly, then your tailstock is off. If your test cut is larger or smaller in the middle then the bed is twisted. If you chuck and cut a test bar without tailstock support, then a straight taper indicates a misaligned headstock. A non-straight taper indicates a twisted bed. by
Rod Shampine
Consider getting rid of rubber leveling pads. The foundation for a lathe bed should be as rigid as possible. With rubber pads, as you change the level at one position, the load changes at other points. The rubber compresses and the shape of the lathe bed changes accordingly. Ever try to level something mounted on multiple springs?
Large lathes, which are required to hold tight tolerances in commercial shops, are frequently installed on foundations that include pilings driven to 100 feet and more. Most home metal shop lathe beds are, however, short and rigid enough to have little deflection. If you really want to get the lathe in tune, leveling is important. The final test is with a test bar to confirm the machine is cutting straight. By
Rod Shampine and Keith Mitchell
back to index
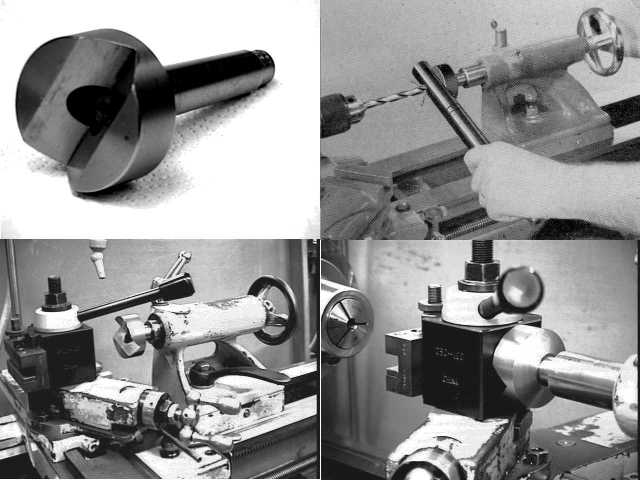
Crotch Center:
Oh the lowly crotch center. Everyone who has one never uses it. Mine is over 30 years old. Back then I just had to have it to complete the tooling for a brand new lathe. Well, the lathe is no longer new, but the crotch center is. I've never used it except during the past month. Now, I'm thinking of getting a spare just in case I misplace it.
We're told to use it for cross drilling a round bar. Chuck a drill bit at the spindle end of the lathe and place the crotch center in the tailstock. With one hand, hold the bar perpendicular to the lathe bed and seated in the crotch, while advancing the ram with the other hand.
Well, I've trouble rubbing my head and tummy at the same time. And, don't try this on brass! The drill bit may
hog-in,
causing the bar to rotate, and give your knuckles a rough encounter with the lathe's ways. Furthermore, there's not much of a relief hole in the crotch's center for the bit when it finally breaks through the bar. It's pure nonsense. The guy who thought up this tool must have laughed all the way to the bank.
Well, all is not lost. There is a use for it. But first, place it in the lathe spindle and face off the flat end. Mine had a good V-notch but not a very flat face.
If you use an Aloris type tool holder, move the cross slide and saddle till a flat side of the tool post is pressed firmly against the face of the crotch center. Lock the tool post's hold-down lever. Now, all your tool bit holders will be either parallel or perpendicular to the lathe bed.
I've been told you can accomplish the same thing with the face end of the tailstock ram. But then what would I do with my crotch center for the next thirty years? By
Dick Kostelnicek;
back to index
Compressed Air in the Shop:
Reduce shop noise with a suction side compressor muffler.
For safe air distribution, use either threaded iron pipe or brazed copper tubing (not soft soldered). SAE flare fittings are OK, but avoid compression bushing couplings. Don't use friable tubing such as PVC.
Slope piping so that condensate drains to a common low point sump. Install an automatic drain valve that is sensitive to pressure changes in order to expel water outdoors.
Water that collects in the tank can be quickly removed by installing a 1/4 turn ball valve at the drain bung. Quickly open and close the valve to blow out the water. You may have to tilt the tank to get all of it out. For tanks too heavy to tilt, install an internal 1/4 in. copper tube that bends down to the tank bottom and passes through the bung plug via a compression bushing. If you see an oil froth in the expelled water and your unit was designed specifically to compress air (some people use reclaimed refrigeration compressors) it probably has piston blow-by an may be worn out.
Centrifugal filter-extractors placed at the compressor outlet don't remove much moisture. There has to be a significant pressure drop and high flow rate to bring the compressed air temperature below the dew point.
For those air tools that need lubrication, this is best done with a couple of drops of oil placed directly into the air fitting prior to coupling up. Messy in-line lubricators tend to distribute oil where it isn't wanted such as inside air hoses. Be careful, since a freshly lubricated tool may exhaust an oil mist right into your face.
Use 220 volts when possible. On 120 V., the large starting current can dim the lights and momentarily slow a machine tool that you're using.
Get the largest tank size available. An 80-gallon unit cycles less often than one with 20 gal. Vertical tanks units take up about the same floor space regardless of capacity.
A single stage compressor can do nearly everything in a home shop from blowing air for cleaning, running impact tools, airing tires, and spray painting. A two-stage compressor stores a lot more air at 175 psi. After regulating it to down to 100 psi, the unit will cycle less often. Also, when regulated down, you won't see the swings in the line pressure as the compressor cycles. A line at 175 psi is more dangerous than one having 100 psi. Also, It is more difficult to couple quick disconnects and they release more violently at 175 psi.
Put a 1/4 turn ball valve coming right out of the tank. When the unit is not in use, turn off the valve. The tank is generally fairly tight while the air lines, quick disconnects, and tools left attached will leak causing the compressor to cycle several times a day.
If you are the only user of air, determine the largest CFM (cubic feet per minute) at 90 psi for the tools you plan to use. Select a compressor that will exceed this delivery rate. Otherwise, you will have to wait for the tank to refill before you can continue to use your tools.
Oil-less compressors are noisy due to the loose tolerance that keeps them from burning up. They have poor volumetric efficiency with generally small or no tanks at all. They are light, portable, and inexpensive. When small enough to be hand carried, they are useful for light jobs such as running an air nailer for home repairs.
Try not to blow chips from lathes or other metal cutting machines with compressed air. Aside from the danger of launching metal projectiles, chips can lodge under machine ways or in chuck and lathe gears. A chip brush and vacuum cleaner are the safe alternatives.
A wind up reel mounted 3 - 4 ft. up on a wall with 50 - 100 ft. of hose will allow you to get to those places that infrequently require compressed air; for example: the bathroom on the other end of the house. Install a 4 in. PVC pipe just below the reel through the wall to the outside. Put plastic screw caps on both ends of the pipe. When you need air outside, say for spray painting or removing wheel nuts on a jacked car, pull the hose off the reel through the in-wall access pipe.
If you run pipe along the wall make sure that you run the pipe down and then back up before going across (P-trap) so that water will collect at a low point. Insert a valve in the bottom of the trap. Make the run a few degrees from level so that the water will collect in the trap. When making long runs make sure to insert a union or two so that you can tighten joints later if they start to leak. I have a refrigerator dryer inline before my tank to eliminate moisture problems. By various club members
back to index
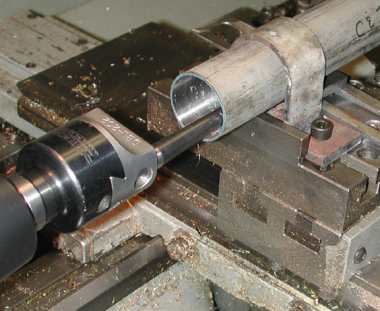
Lathe as Horizontal Boring Machine:
The photo shows how I solved a problem of boring out the inside of the end of a section of pipe that was too long for my lathe and too big to go thru the spindle bore. The pipe is 1-1/4 inch stainless steel and is four feel long. I made a simple clamp section to hold the pipe down on the rear tool block section on my lathe. I used wedges to adjust the height of the work and the clamp screws pulled the work down tight on the wedges. The other end of the pipe is supported by the steady rest and is set up loose enough to permit the work to slide. The next version will have a split block with bushings for different sizes of work and bored in place to obtain the correct centerline height. By
J. R. (Joe) Williams
back to index
 Working with metal in Houston, TX USA